April 29, 2014

Spring 2014 Collection: Meet Tara!


Fabric: Lula Magnolia by The Quilted Fish for Riley Blake Fabrics


Hello Everyone!

Well, it's that time of year again....I have been super busy working through the new designs, which entails a lot of drafting, then sewing, photography, and writing! I am excited to share the first of the new designs with you today, The Tara Tank Dress!

This is a wonderful dress design for any time of year. Perfect by itself during the spring, summer, and early fall, pair it with a cute jacket or cardigan, maybe some skinny jeans or leggings, and you can keep wearing it through the rest of the fall and into winter. I have provided a variety of skirt lengths so you can make anything from a tunic length to a maxi.

 
Fabric: Beauty Queen by Jennifer Paganelli for Free Spirit Fabrics


Fabric: Botanique by Joel Dewberry for Free Spirit Fabrics
 

This is a super quick design to sew as there is no closure to worry about! Simply pull it over your head and pull up the drawstring and that's it! I opted to do a bias binding on the neckline and armholes, so there aren't any facings to mess with, either. This is a perfect beginner dress or something super fast and fun for the experienced sewer.

Of course I have added in all sorts of variations for you, as you will see in the photographs. For the gray eyelet version, there is some hand embroidery around some of the openings of the fabric. I include the different stitches I chose to use for that part.


Fabric: Grey Eyelet and coordinating Cotton Couture Solid by Michael Miller Fabrics
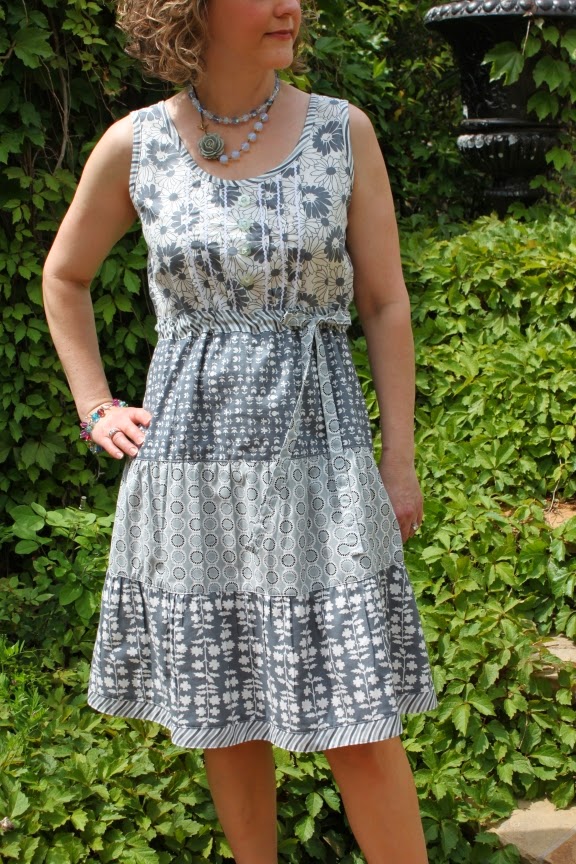
 
 
Fabric: Weeds by Me & My Sister for Moda Fabrics
 

The bodice of the design has 6 pleats centered on the front. These are so easy to do! Simply fold, press, and stitch 1/4" away from the fold, and then press again...it's a snap! This dress can be made from regular cottons, eyelet, cotton lawn, or voile. If you are using a really sheer fabric or the eyelet, be sure to line the bodice and skirt. This is easy to do, as I have included a front bodice piece without the pleating to make a lining. Simply add the lining to the bodice before binding and that's it!

The skirt has the option of being slightly gathered (if you would like a bit more room through the hips) or plain (still plenty roomy!). You can also choose to center the drawstring or place it over to the left front.

 
Fabric: Color Me Happy by V & Co. for Moda Fabrics


Fabric: Roses by Martha Negley for Westminster Fabrics, paired with the NEW Jade Jacket!


Note that I am also including the different fabrics used for each variation. I was lucky enough to use some brand new fabric that isn't out quite yet, but keep your eyes peeled, as it will be out soon!

The new patterns are now available for sale on our website!
Go place your order today!

 
Fabric: Sweet as Honey by Bonnie Christine for Art Gallery Fabrics


Fabric: Confetti Border Print with coordinating Cotton Couture solid by Michael Miller Fabrics


Thanks so much, and as always....HAPPY SEWING!


February 5, 2014

Mystery Sew Red Sew-along!

 
Hello Everyone!
I am so excited to be a part of the Mystery Sew Red Sew-along that is being hosted by Jimmy Bean's! If you are not already participating in this project, you can click on the link above to get the scoop!!
 
This is block #5 for the series. This block measures 10 1/2" square. I used a square from a layer cake of precut fabrics for the background but any fabric you have lying around that meets the size requirement will work. The best part about this block is that you can use up little scraps you may have left from another project! 
 
Materials Needed:
For the applique: 5 assorted fabrics, at least 8"x 2" (note the bird fabric is wider)
Background: 1 - 10 1/2" square
1 - 12" square non fusible lightweight interfacing
temporary adhesive spray, such as Sulky KK2000
rotary cutter, ruler, and mat
matching thread
1 piece of 8.5 x 11 paper
pencil or marker
scissors
fabric marking pencil

Start by folding the paper in half so that it measures 5.75 x 5.5. Now is the time to use your mad skills from when you were a kid cutting out paper hearts for Valentine's day....draw and cut out a heart approximately the size shown below. IMPORTANT!! Save the outer portion that you cut the heart from as you will use this in a later step.


Lay out your fabrics in an order that is pleasing to you.


Notice how I cut out this line of birds to showcase it through the heart. I made sure to allow my 1/4" seam allowance plus a little extra above and below the birds.


For the remaining 4 fabrics, I cut strips that were 2" wide. Since I was again working with leftover squares from a layer cake, these measure 10 1/2" wide, but you won't need more than about 8".


Stitch the strips right sides together with a 1/4" seam allowance.


Press the seam allowances open.


Using the outer portion of the paper from earlier, lay it over the fabric strip unit. Move it around until you are happy with the placement. Keep in mind that the edge of the heart is the stitching line, so the seam allowances will be OUTSIDE of this area. I liked the strips going horizontally, but you could do a vertical or diagonal placement as well. Once you have the heart shape placed where you like, use a fabric marking pen to mark the edge of the heart shape.


Here is the fabric unit with the heart shape.


Next, place the non fusible interfacing on top of the RIGHT SIDE of the fabric unit. I didn't have any non fusible lying around, so I used some pattern tracing cloth. It is important to use something that is semi-transparent so that you can see the outline of the heart in order to stitch.


Stitch on top of the marking all the way around, backstitching at the beginning and ending of stitching.


Here is the stitching completed.


Cut away the excess fabric, 1/4" away from the stitching line.


Trim off the fabric close to the point.


Clip to the inner point of the heart. Be careful not to clip through your stitching.


Clip the curves of the heart.


Pull the interfacing away from the heart and clip an opening.


Turn the heart through the opening. This is what it will look like from the wrong side.


Here is what it looks like before pressing. Be sure to fully turn out the curved sections as well as inner and outer points.


Here is the heart after pressing.


Center the heart on the background fabric. Mine measured approximately 1 3/4" from the side edges. Use temporary adhesive spray or pins to secure the heart and prepare it for stitching.


Complete the heart by stitching around the outside edge. I used a wide blanket stitch on my machine.


Your block is complete!

October 18, 2013

Fall 2013 Collection: Zip to it! Accessories

Moda Fabrics: Honeysweet by Fig Tree & Co.

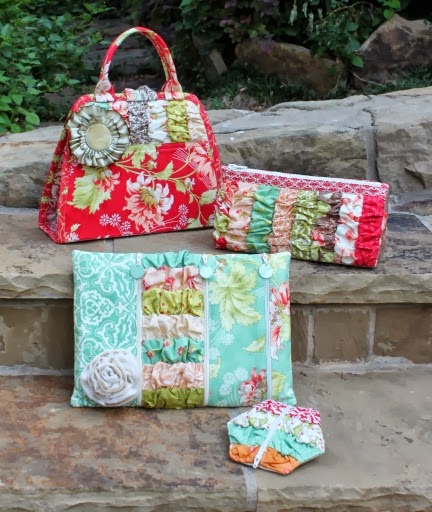
This is the final reveal of the fall collection. Zip to it is a fun booklet with 4 different accessories in it. I developed a really neat ruching technique that uses pre-cut 2 1/2" wide strips. It is a great way to showcase lots of prints in a collection. I also used some yardage from the collection to make up the rest of the fabrics needed to complete the projects.

In addition to the ruching technique, I also wanted each project to have a zipper in one way or another. I know a lot of you out there hate the idea of putting in a zipper, but really, these are EASY to do! The booklet comes complete with a pull out center page that features full sized pattern templates. You will need to trace then onto freezer paper, but there is no enlarging to be done.

The accessories are very versatile. While I had specific uses in mind, certainly you will think of many ways they can be used.

First up is the Hexie Pouch. I designed this one for keeping your earbuds secure while out and about, but I can see how this little pouch would be perfect for loose change or other small items. I designed it to work with the pre-cut hexagons, so feel free to use those if you like.


Next is the Tablet Sleeve. I designed this one to fit the ever popular tablet computers. Specifically, it works well for the Microsoft Surface and iPad, but I am sure it would work for most without having to resize it. Its overall measurements are 8 1/2" x 12". It features two exterior pockets of varying depth that are separate from one another so that you can stash different items like keys, a phone, glasses, etc. in those while keeping the innermost pocket free for your tablet. The tablet section is lined with a super soft flannel so your computer will not get scratched. I think this is a perfect cover for your tablet just to carry around or to put into a larger bag.


The Triangle Bag is the next project. This is where the ruching really shines. This is a perfect little bag for stashing art or sewing supplies. It would make a great little toy stash for kids as well.


The last accessory is the Project Portfolio. It looks like a bag from the outside, but when opened, it features two clear pockets that are zipped shut. These are perfect for holding a small needlework project. I love the depth of each pocket. These really will hold items without a problem. I think this would also make a great makeup bag since the pockets are made of vinyl. If I were using it for that purpose, I think I would also make the interior from a laminate so that the entire inside of the pocket could be wiped clean if need be.


Well, that's it for the fall collection! I hope I have inspired you to get busy in your sewing room!

Happy Sewing!!

October 17, 2013

Fall 2013 Collection: Fashion Formula Skirts, Volume 3!


Gathered Panel (alternating)
various Anna Maria Horner fabrics...scrappy!


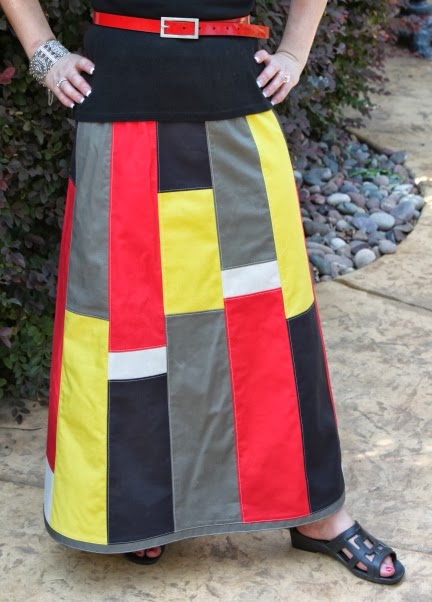
Well, I just couldn't help myself! I have designed yet another set of skirts for my Fashion Formula line. This time I decided to do a 12 panel skirt 12 different ways. As per the other skirt booklets, you will be basing your skirt from your hip measurement. The booklet gives yardage for hip sizes 34-50. Believe it or not, all of these skirts are created from the same basic 12 panels. The insertion of pleats, godets, or gathered panels makes them look strikingly different.

The waistband is a wide casing with one piece of soft elastic in it, so it is easy to insert and very comfortable to wear. I like to have my casing a bit wider than the actual elastic, as I think it lays better against your body as well as being more comfortable. The overall appearance of the casing is pleasing as well and you may find that you don't mind the elastic part being visible. In the photos, you will see that I opted to tuck in my shirt on several of the shots.

The skirts in the booklet are intended to be long. I give instructions for lengths 32, 34, and 36 for you tall gals! If you want to make a shorter skirt, you can always shorten your panels before tapering them.

I have placed the skirts into 4 groups: plain, gathered panel, godet, and pleated. Below are the details for each skirt included in the booklet. Just think of all the great skirts you can get from one set of simple instructions! The possibilities are endless...truly!

Plain, with bias trim between panels and hemband
Michael Miller Waterfront Park fabric
 
Colorblock with Moda Bella solids
 
Amazing Technicolor Dream Skirt with Moda Laundry Basket "Over the Rainbow" batiks
 
Gathered panel (set of 3 at center front and back) from brown linen
 
Gathered Panel (alternating), Free Spirit Tina Givens fabric
 
 
Godet, 3 at center back
Free Spirit Anna Maria Horner Hand Drawn Garden fabric
 
Alternating scrappy pieced godets, gray linen skirt
 
Godets between each panel
Alexander Henry fabric with Amy Butler godets
 
Box pleats (3 at center front and back)
Robert Kaufman cotton chambray
 
Alternating box pleats,
Moda dot, Alexander Henry large dot on pleats
 
Box pleats between each panel
Moda Lush Uptown fabrics
 
 
Lots and lots of skirts.......have fun with it!
 
Happy Sewing!