
I had a great weekend meeting customers and signing books over at Cabbage Rose in Fort Worth on Saturday. Thanks to all of you who came out and made this a special weekend for me and the shop. Be sure to visit their blog to see photos of the event. They are also doing a giveaway of my book, so don't miss out...go over there and sign up. Maybe you will be a lucky winner!
And now......
It's finally ready! The summer tutorial!! This was originally a flower embellishment that I made for the Monique Dress neckline with a few modifications. I have added an alligator clip to the back to make it more versatile and the circle that the ruffle is sewn to is slightly smaller to make the flower a bit fuller. This is a wonderful accessory for a jacket, dress, skirt, bag, to dress up a tank top or T-shirt (neckline or hemline)...even your hair!

I use a ruffler foot attachment to make the flowers. This is a fabulous foot and I highly recommend it for anyone who likes nice crisp ruffles. Plus, you don't have to pull up any pesky threads to gather and it is super fast....they are a little expensive, but worth their weight in gold (well, almost!).
Follow the steps below to make as many as you like and have fun with them. If you would like to share your work, please feel free to post to our fan page photos on Facebook. I am working on getting a link on the blog for a Flickr group, so keep your eyes peeled for that.
Here is what you will need for your flower:
2" x 45" strip of fabric
ruffler attachment for your machine (this is fabulous, but if you don't have one, then just gather the flower with two rows of long straight stitches instead)
2 - 2 1/2" squares of wool or woolfelt
1 large button for the center
several 6/0 glass beads for embellishment
1 metal alligator hair clip, about 2" long
hot glue
hand needle and thread

Cut a strip of fabric 2" wide by the width of fabric.

Trim off the selvages.

Press 1/2" to the wrong side at both ends of the strip.

Fold the strip in half widthwise, wrong sides together, and press.

Place the raw edge of the pressed strip on the right hand side and slip into the ruffler attachment, set at every stitch.
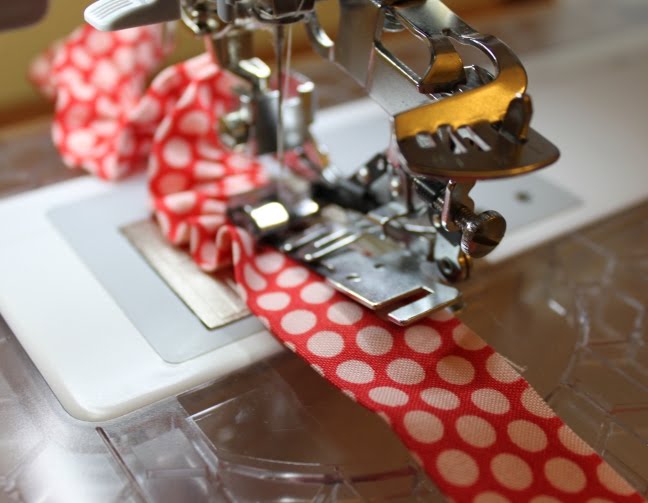
Begin ruffling!

Press the ruffle flat.

Cut a 2 1/2" square of woolfelt, then roughly draw a circle just as a guide. Notice that this is the largest circle that could be drawn, so you only lose the corners. Once you have made one flower, drawing the circle will probably not be necessary for the next one.

Begin sewing the strip to the woolfelt square. Line the stitching up with the lines that you drew for the circle and turn as necessary to continue sewing.

Once you have made it all the way around the first time, place the strip just to the inside of the first row and continue in a concentric circle until the entire strip has been sewn down...see below....

By the time the entire strip is sewn, there should not be any woolfelt visible at the center of the flower. If you do have a small amount, don't worry about it as the button at the center will cover it.

Here is the flower all stitched in place.

Turn the flower over and check your stitches.

Trim off the corners...see, even mine is not perfect, but hey...it IS the back and by the time this flower is finished, no one will see this!
Give the flower a light press from the back, flip it over and sort of scrunch up the layers a bit, then steam it a few times to fluff it.

Here is mine, "post-fluff"...

Add the large button of your choosing to the center by hand.

Then add the glass beads as you like.

Flip the flower over and add the alligator clip with hot glue. Notice how mine is just inside the outer edge of the flower so that the clip will not show during wear.

Trim down the remaining 2 1/2" square to be a circle, add it to the back and hot glue in place. This covers those stitches and trimming from earlier steps and leaves a nice finish.

Now, put that flower in your hair, on your clothes or bag and look fabulous!!

Happy Sewing!!