Showing posts with label bags. Show all posts

October 13, 2015

Fall 2015 Collection: Meet Margo!


The second reveal of the Fall 2015 Collection is the Margo Wallet Bag. I decided to create another wallet style pattern since Madison has been such a hit. We are currently waiting on the reprint of Madison so we can start shipping her out again. The new stock and reprints should arrive by the end of this week.

Alison Glass' Ex Libris prints for Andover Fabrics

Margo is a great little bag, and you will see that the card pocket panel is stashed underneath the flap on the front exterior. This makes your cards accessible without having to dig around on the inside of the bag for anything. The flap has a turn lock to keep everything secure, yet easy to access. I also added a zippered pocket to the back exterior for a phone or other small accessories.

Shannon Fabrics Cuddle (Faux) Suede with Riley Blake Parisian pockets and lining

The interior of the bag features another zippered pocket and large patch pockets to help keep you organized. This bag is small but mighty! It will amaze you how much you can carry around in it for its size. The strap is adjustable so you can wear it cross body or over one shoulder.

Fog City Kitty by Pam Kitty Morning for Lakehouse Fabrics with contrasting lower exterior

You can use a wide variety of fabrics for this bag, such as quilting cotton, faux suede, linen, lightweight denim, chambray, batiks, lightweight corduroy, lightweight wool, etc. Be mindful of the weight of the fabric as really heavy fabrics would overwhelm this design as well as make it difficult to handle during construction.

Exterior of faux suede bag with flap closed

I used a combination of stabilizers for this bag. After making several prototypes, I concluded that making the entire exterior from Pellon's Deco-Fuse 520 would be too difficult, so I swapped out for a foam stabilizer (Pellon's new Flex Foam one sided fusible) as the base for the exterior. I still wanted a sturdy base for the bag, so I added the Deco-Fuse 520 to the base of the lining. It worked out great and made the bag so much easier to stitch together, while still lending the needed structure.

Mama Said Sew, Volume II by Sweetwater for Moda with contrasting lower exterior

Lastly, I get all my hardware from The Buckle Guy. If you have not checked out their website, I highly recommend that you do. Their hardware comes in a variety of metal finishes and has nice sturdy construction. I have never had any hardware from them that I didn't love. You need to check them out!

Zombie Love by Emily Taylor for Riley Blake Fabrics
 
We expect the stock of this new bag to arrive by the end of this week. We are working to get these posted to the website and will send out notice when they are up for sale and ready to ship out!
 
Happy Sewing!

October 12, 2015

Fall 2015 Collection: Meet Cheyenne!

Kaufman Newcastle denim with batik lining,
featuring hand embroidery from our Cottage Roses Stitchery pattern

Well, it's that time of year again! I have been hard at work designing the fall collection. I have four new designs to share with you for the fall. It has been a while since I released any new bags, so there are two new ones in this collection for you to enjoy!

The Cheyenne Rope Bag is the first reveal of the fall collection. I have been wanting to design a backpack, but didn't really want two straps. I guess it is because a lot of us never use both straps and then the one that isn't being used just sort of dangles there looking unloved! When I researched sling style backpacks, I discovered the rope bag. I had never heard of one before. That tells you how much I know about rock climbing (I definitely don't climb rocks!). For those of you who are also unfamiliar with a rope bag, rock climbers use them when climbing to hold their extra ropes and supplies. The bag is held on with one strap and zips along one side for easy access to the contents. Of course, most of the commercially made bags are hideously ugly and very utilitarian, but I could see the beauty in the design and got to work.

Shannon Cuddle Suede (faux suede) with faux suede fringe on the pocket flap
and a quilting cotton lining

Initially, I thought about having a separate piece to create the depth of the bag like a usual backpack design, but I wanted to branch out and do something REALLY different. I let my brain work on it a bit and then the idea dawned on me...what if I could make the bag from only TWO main pieces? I got busy experimenting and before long I had an idea that worked. This bag really IS made from only TWO main bag pieces! I was able to get the three dimensional depth by darting the front piece before it is added to the back. I LOVE the shape and easy access to the contents. I also love that it is EASY to sew!

Riley Blake Elements, Equations, and basic fabrics. I call this one my Breaking Bad bag!

Once the "bones" of the bag were in place, I added some good solid details, like a front darted pocket and a zip pocket on the back exterior for a phone or other small items. The wide strap is adjustable and works well over one shoulder or cross body. Adding the lower tab along one side of the bag makes it really hug your back during cross body wear. It is a bag that would be great for a guy in really masculine fabrics, for a kid in fun themed fabrics, or for anyone else with whatever fabrics tickle your fancy.

Laundry Basket's Color Daze linen Fabric from Moda, featuring faux suede fringe on the pocket flap.

The design lends itself very well to a variety of fabrics, as you will see in the photos. Feel free to choose just about any fabric except knit or something really heavy like stiff canvas. It would work in canvas, but the seams will get thick and turning it right side out might be a challenge. I recommend the following fabrics: quilting cotton, twill, linen, faux suede, home decorating weight fabrics, corduroy, lightweight wool, velveteen, heavy silk, or lightweight denim, to name a few. A lining from quilting weight cotton is recommended.

Feel free to add your own special details as well. I added faux suede fringe to two of the bags and hand embroidery to the denim one. I mainly stick with sport zippers for this bag, but you can use metal zippers if that is your preference. If you choose metal, seek out the 7" length, or you will have to contend with shortening the zipper so you don't have to sew across the metal teeth.

A word about the stabilizer for this bag: FOAM! I experimented with several brands for this bag and with fusible VS. non-fusible. I can tell you that fusible is HIGHLY RECOMMENDED. Because of the way the zipper openings are constructed, it is important for the layers of fabric and stabilizer to be very attached to one another. Otherwise, you may have a wonky opening, and no one wants that.

My absolute favorite stabilizer for this bag is Pellon's new Flex Foam one sided fusible. I can't say enough good things about this foam! It has a great adhesive on one side that fuses quickly and effortlessly to the fabric and does NOT crinkle when you turn the bag right side out. It holds its shape well, is easy to sew through, lightweight, and looks great when the bag is finished. What more could you ask for?

Flying Colors linen by MoMo for Moda with a quilting cotton lining

Lastly, I get all my hardware from The Buckle Guy. If you have not checked out their website, I highly recommend that you do. Their hardware comes in a variety of metal finishes and has nice sturdy construction. I have never had any hardware from them that I didn't love. You need to check them out!

Passport by 3 Sisters for Moda
 (This was the prototype bag when I was experimenting with different foam stabilizers. If you look closely, you can see the crinkling in the foam and fabric from the fusible.
This is NOT the Pellon product.)

We expect to have the stock for these patterns in a few days. We'll be adding them to our website for easy ordering and posting to Facebook as soon as they are ready to go out the door.

Happy Sewing!

May 10, 2015

Spring 2015 Collection: Smell the Roses!

 
Stitched on white linen with pearl 5 cotton from Weeks Dye Works and DMC

Cottage Roses is the last design in the new spring collection. It is part of my new stitchery series for applique and hand embroidery along with Birds in Flight. I thought it would be great to offer a lower priced set of stitchery patterns to you that you can use on anything you want......these designs lend themselves so well to clothing, bags, quilts, pillows, or a lovely stand alone piece of artwork. There is such a quiet peace in sitting and stitching! I do love that time. In this world of nonstop everything, doing handwork is very grounding and there is something so nice about something you can take with you anywhere and work on it a bit at a time at your whim, using stitches, thread and colors of your own choosing and creating something truly unique.

The pattern includes some tips on technique and how to complete the applique as well as hand embroidery, everything from tracing to stitches that I used. I also add a few embroidery details so that you can use some of my ideas if you want. I fully encourage you to go your own way and make these designs your own, though!

I chose a variety materials for these designs to show their versatility. The main photo is stitched on white linen with pearl 5 threads from Weeks Dye Works and DMC. This particular piece is now stretched and inside an oval frame...perfect for hanging on the wall. There is so much lovely thread on the market! Choose your favorite and enjoy your stitching.

I also used wool from Weeks Dye Works to complete the applique shown in the photos. I particularly love the texture of the pearl 5 on top of the fabric. The details really pop, especially when using a thread that has a lovely variegation.

I offer these designs in a variety of sizes and filled the pattern with as many roses as I could fit, then I give you the option to enlarge or reduce these on a copier to satisfy your own creative desires. I love how versatile these flowers can be, depending on how you want to interpret them with fabric and thread.

I fully plan on adding some of these lovelies to a skirt for the summer. I will love completing the stitching and then getting to wear it during the hot summer days.

Below is our Aspen Tunic with the roses added. You can really see the stitching detail on the close ups of the front and back yokes.


Our Aspen Tunic pattern with Cottage Roses added to the front and back yokes
 
Next up is our Lola Gypsy bag pattern with the roses added. This is the non-ruffled variation of the bag and I think it is the perfect canvas for showing off these pretty blooms!


Our Lola Gypsy bag pattern with Cottage Roses added to the side


This pattern is available for purchase on our website. Thanks for taking a look and let me know what you think!


Happy Sewing!

October 18, 2013

Fall 2013 Collection: Zip to it! Accessories

Moda Fabrics: Honeysweet by Fig Tree & Co.

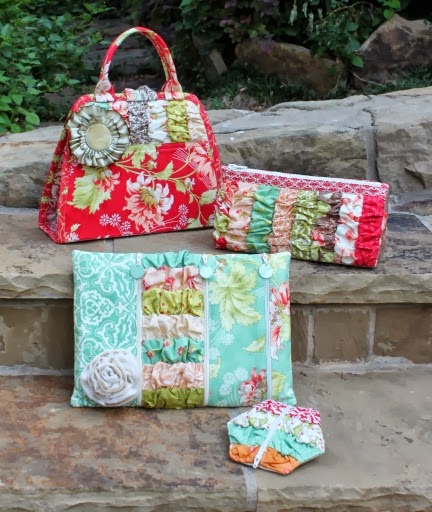
This is the final reveal of the fall collection. Zip to it is a fun booklet with 4 different accessories in it. I developed a really neat ruching technique that uses pre-cut 2 1/2" wide strips. It is a great way to showcase lots of prints in a collection. I also used some yardage from the collection to make up the rest of the fabrics needed to complete the projects.

In addition to the ruching technique, I also wanted each project to have a zipper in one way or another. I know a lot of you out there hate the idea of putting in a zipper, but really, these are EASY to do! The booklet comes complete with a pull out center page that features full sized pattern templates. You will need to trace then onto freezer paper, but there is no enlarging to be done.

The accessories are very versatile. While I had specific uses in mind, certainly you will think of many ways they can be used.

First up is the Hexie Pouch. I designed this one for keeping your earbuds secure while out and about, but I can see how this little pouch would be perfect for loose change or other small items. I designed it to work with the pre-cut hexagons, so feel free to use those if you like.


Next is the Tablet Sleeve. I designed this one to fit the ever popular tablet computers. Specifically, it works well for the Microsoft Surface and iPad, but I am sure it would work for most without having to resize it. Its overall measurements are 8 1/2" x 12". It features two exterior pockets of varying depth that are separate from one another so that you can stash different items like keys, a phone, glasses, etc. in those while keeping the innermost pocket free for your tablet. The tablet section is lined with a super soft flannel so your computer will not get scratched. I think this is a perfect cover for your tablet just to carry around or to put into a larger bag.


The Triangle Bag is the next project. This is where the ruching really shines. This is a perfect little bag for stashing art or sewing supplies. It would make a great little toy stash for kids as well.


The last accessory is the Project Portfolio. It looks like a bag from the outside, but when opened, it features two clear pockets that are zipped shut. These are perfect for holding a small needlework project. I love the depth of each pocket. These really will hold items without a problem. I think this would also make a great makeup bag since the pockets are made of vinyl. If I were using it for that purpose, I think I would also make the interior from a laminate so that the entire inside of the pocket could be wiped clean if need be.


Well, that's it for the fall collection! I hope I have inspired you to get busy in your sewing room!

Happy Sewing!!

October 9, 2012

New Fall Collection: Meet Lola!

The Lola Gypsy bag is the third design of the new fall collection. I was inspired to make this bag after seeing a woman in a restaurant with a very similar bag. I was so taken with the billowy nature of the ruffles and just the overall carefree look that I had to try designing one myself!

 
Valori Wells fabrics for Free Spirit, Cocoon (cotton voiles), mixed with quilting cottons
and Vicki Payne home dec fabric on ends and handles.
 

I chose to make the ruffles from cotton voile and cotton lawn, but they would also be lovely from an iridescent silk. This bag has loop handles upon which the bag is gathered onto during construction. The interior boasts a large zippered pocket on one side with two sizes of patch pockets on the other and a magnetic snap. Since the bag is large on the inside, these additional storage compartments will help keep you organized.

 
Innocent Crush cotton voile by Anna Maria Horner and Curious Nature by Parson Grey


Liberty of London cotton lawn ruffles and scarf with
Robert Kaufmann printed linen for main bag exterior
 

Since I know that ruffles are not everyone's cup of tea, I have offered two other variations for this bag. One is a solid piece side where you can choose to really showcase the motif of a fabric. I like to make this one from heavier weight fabric, such as home dec.

 
Amy Butler home dec fabric with cotton voile scarf from Amy's cameo line

The other variation offered is a patchwork made from 5" squares. It takes 31 squares to make the exterior of the bag. This is great for using up scraps or leftover charm squares from your stash.


Charm squares from Little Black Dress by BasicGrey for Moda fabrics
 

For this design, I decided to use a stabilizer called Roc-Lon Multipurpose cloth. This is also known as "black-out". You can find it online by the yard or you may find it in the home decorating section of fabric stores. Here is a link I found where you can purchase it at Fabric Depot. I personally used the 36" width, but you can choose to purchase a different width. This will affect the amount of yardage (you would need less of a wider width). The reason I chose this stabilizer is because of its supple nature. It feels a lot like canvas, but because it does have some synthetic components, it is resistant to wrinkling and holds its shape quite well. Plus, it is a breeze to stitch through! It is well worth seeking this product out!


The pattern includes full size pattern pieces and complete instructions for all of the variations, including the scarf.

This pattern will be available in a few days....the stock just came and we have to get the patterns listed online first, then you can purchase it!

Happy Sewing!!


October 5, 2012

New Fall Collection: Meet Madison!

The Madison wallet bag is the next new design in the fall collection that I would like to share with you today. While I was on the dreaded crutches with the Great Toe Incident, I needed a cute bag that held all of the essentials without the hassle of trying to carry it around. Designing the bag was just the distraction I needed while I was healing! I love this bag so much that I am still using it, even though my toe is healed! It is perfect for quick errands and has a place for everything, including a zippered outside pocket for your phone.


The front of the bag has a wallet flap to hold your ID and credit/debit cards so that they are at a fingertip's reach. This flap is held secure with a magnetic snap so you don't have to worry about it coming loose if you need something from the inside of the bag. The interior is roomy for a small bag, with a zippered pocket on the inside to keep other items organized.


Michael Miller fabric, houndstooth. Other fabrics are Millie's Closet from Riley Blake.

 
Moda Fabrics, Simply Color

I know that some of you cringe when you think about installing a zipper. I PROMISE...these zippers are a cinch to install and you will love the professional finish once they are part of the bag. Give it a try!

I designed the handle to be adjustable with a double loop slider, one of my favorite pieces of hardware. This enables you to lengthen or shorten the handle at will so that the bag can be comfortably be worn cross-body or over the shoulder.

I know that many of you are always looking for good bag hardware, so I am including two of my favorites here. www.buckleguy.com is my number one favorite. I visit this site first when looking for my hardware. If for some reason you can't find what you are looking for, take a look at www.strapworks.com. They have some great stuff also.

The overall dimensions of the bag are 8" wide x 6" tall x 2" deep. I have offered several variations to mix up the look. You can choose several coordinating fabrics or just a few of your favorites. I have included a variation to use leftover 2 1/2" wide strips that you might have lying around for the main exterior flap and body of the bag with a few matching coordinates. You can even opt to add a collage style applique to the exterior of the bag. This was influenced by the decorating I did to my cast. You just never know where inspiration will come from!

 
Michael Miller Fabric, tiny houndstooth.
 I added motifs from other scraps I had to make the collage style applique.

This little bag is easy to stitch together. I used a new Pellon product for the stabilizer in this bag and am super pleased with the result. It is Pellon 520 Deco-Fuse. It is fusible on one side and is about as thick as construction paper. Don't let its thin nature fool you. This stabilizer has a nice firmness to it. Other benefits are that it is easy to sew through multiple layers and it does NOT crinkle when you are turning pieces right side out! I highly recommend this stabilizer. I think you will love it once you give it a try!


I know that some of you will notice the adorable zipper pull I have added to the exterior zipper of the bag. These are made by Inazuma. You can purchase some at http://store.atelierdehappa.com/zipper-pull.html. There are also sellers on Etsy who are selling them. Just put Inazuma zipper pull in your search and you will find them.

 
The two bags in the foreground are Moda fabrics. The one on the left is Noteworthy by Sweetwater (not yet released) and Mama Said Sew, also by Sweetwater.
 
This pattern will be available mid-October for purchase.
 
Until next week my friends, Happy Sewing!

April 27, 2011

Last Sneak Peek: Meet Camilla!


Here is the last new design for spring, the Camilla Insulated Bag. I was inspired to come up with this design at the request of a friend who was having a hard time finding a good quality lunch bag with the correct proportions. That was a good challenge for me and it grew into a rather nice design, I think! Once I had made the bag in the size she needed, I realized the possibilities this bag had in other sizes too. After getting three worked up in different sizes using the laminated fabrics, I thought it would make a nice handbag or tote too, so the pattern offers 5 different sizes with endless possibilities!

The largest size made in laminates would be great to pack up a lot of food for a picnic or snacks for a road trip. It would also work nicely for trips to the grocery for small bags of frozen items or fruit. The two other sizes as insulated bags work well for lunches, drinks, or snacks. These bags have a full velcro closure across the top just under the handles to help keep your items at a good temperature.


The non-insulated bags have interior pockets and a magnetic closure. I played around with the depth of the bags and made them a bit shallower so they would be better suited to use as handbags. You will also notice that I used my flower from the Summer Flower Tutorial to embellish some of the bags.

A tip for working with laminates: try using your walking foot. I found that it worked better than my teflon foot! Because I was quilting layers of insulated batting with the laminates, I needed an even feed under my machine. I thought I would see what the walking foot would do with the laminated fabrics. It was fabulous! I can't recommend this highly enough.


I also made some fabrics into laminates by using the iron-on vinyl from Therm-o-Web. This was an easy product to use and I got great results. It doesn't make the fabric too heavy to sew with, so I recommend trying that as well, especially if you find some fabrics that you want to use and they are not offered as laminates.


Lastly, I used some of my Echino Japanese linen for one of the large tote bags....LOVE it! When working with heavier fabrics, I make some recommendations in the pattern for the type of stabilizer that will work best, so hopefully it will help in making good decisions when you get ready to make your bags.

So, that's it! Now you have seen all the "newbies" for spring. The stock has just arrived, so it will only be a matter of DAYS before we have these listed and ready for purchase!

Happy Sewing!

April 21, 2011

Sneak Peek #3: Meet Rita!


The Rita Reversible is my take on the popular reversible bag design idea. This design is like getting two bags in one! Both sides are fully functional to be used as an exterior and there are lots of design choices.

I know that a lot of us like to try to keep our bags organized, so if you make a variation with pockets on all sides, you will get the benefit of four really nice deep pockets to stash your stuff. Most of the variations offer the pocket style with pieced panels. You can add your own flair by adding the plain or ruffled contrast trim between. Below you can see the variations with those trims added.


Ruffled Trim, Side 1


Ruffled Trim, side 2


Plain Trim Variation

If you are in love with a particular fabric, you can opt for the one piece variation and showcase the motif on each side. On the one shown below, I used a coordinate from the same line and did the pocket variation so there would be at least two nice pockets integrated into the bag. I also left the handle longer on this one so it could be cross-body length.


What is even better is if you are in love with two different sets of fabrics...what to do? Feature one set for each side! Then you can have two totally different looks with one bag. With this idea, I had a lot of leftover black and white fabrics and decided to scrap it up a bit. It is a great way to use up your little bits!


Black and White Bag, side 2

The closure is offered two ways: a loop and button, or buttonhole and button. I chose to use large coverable buttons so I could feature different little design elements from the fabrics as an added accent. A large pretty button would also look great.

I used Shape-Flex stabilizer in the bags. It is a great woven cotton fusible interfacing that has a lot less trouble with a crinkled appearance. This is particularly helpful since this bag is reversible. I also used fusible fleece to add a little more structure for the quilting weight cottons.

This bag is a great way to express your creativity. The pattern should be in stock in a week or so...we will let you know as soon as it is available for purchase!

Happy Sewing!