October 18, 2013

Fall 2013 Collection: Zip to it! Accessories

Moda Fabrics: Honeysweet by Fig Tree & Co.

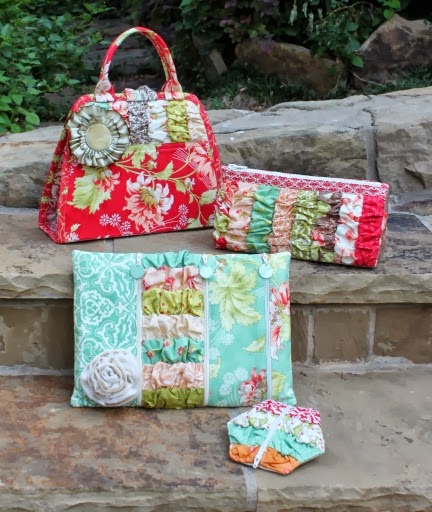
This is the final reveal of the fall collection. Zip to it is a fun booklet with 4 different accessories in it. I developed a really neat ruching technique that uses pre-cut 2 1/2" wide strips. It is a great way to showcase lots of prints in a collection. I also used some yardage from the collection to make up the rest of the fabrics needed to complete the projects.

In addition to the ruching technique, I also wanted each project to have a zipper in one way or another. I know a lot of you out there hate the idea of putting in a zipper, but really, these are EASY to do! The booklet comes complete with a pull out center page that features full sized pattern templates. You will need to trace then onto freezer paper, but there is no enlarging to be done.

The accessories are very versatile. While I had specific uses in mind, certainly you will think of many ways they can be used.

First up is the Hexie Pouch. I designed this one for keeping your earbuds secure while out and about, but I can see how this little pouch would be perfect for loose change or other small items. I designed it to work with the pre-cut hexagons, so feel free to use those if you like.


Next is the Tablet Sleeve. I designed this one to fit the ever popular tablet computers. Specifically, it works well for the Microsoft Surface and iPad, but I am sure it would work for most without having to resize it. Its overall measurements are 8 1/2" x 12". It features two exterior pockets of varying depth that are separate from one another so that you can stash different items like keys, a phone, glasses, etc. in those while keeping the innermost pocket free for your tablet. The tablet section is lined with a super soft flannel so your computer will not get scratched. I think this is a perfect cover for your tablet just to carry around or to put into a larger bag.


The Triangle Bag is the next project. This is where the ruching really shines. This is a perfect little bag for stashing art or sewing supplies. It would make a great little toy stash for kids as well.


The last accessory is the Project Portfolio. It looks like a bag from the outside, but when opened, it features two clear pockets that are zipped shut. These are perfect for holding a small needlework project. I love the depth of each pocket. These really will hold items without a problem. I think this would also make a great makeup bag since the pockets are made of vinyl. If I were using it for that purpose, I think I would also make the interior from a laminate so that the entire inside of the pocket could be wiped clean if need be.


Well, that's it for the fall collection! I hope I have inspired you to get busy in your sewing room!

Happy Sewing!!

October 17, 2013

Fall 2013 Collection: Fashion Formula Skirts, Volume 3!


Gathered Panel (alternating)
various Anna Maria Horner fabrics...scrappy!


Well, I just couldn't help myself! I have designed yet another set of skirts for my Fashion Formula line. This time I decided to do a 12 panel skirt 12 different ways. As per the other skirt booklets, you will be basing your skirt from your hip measurement. The booklet gives yardage for hip sizes 34-50. Believe it or not, all of these skirts are created from the same basic 12 panels. The insertion of pleats, godets, or gathered panels makes them look strikingly different.

The waistband is a wide casing with one piece of soft elastic in it, so it is easy to insert and very comfortable to wear. I like to have my casing a bit wider than the actual elastic, as I think it lays better against your body as well as being more comfortable. The overall appearance of the casing is pleasing as well and you may find that you don't mind the elastic part being visible. In the photos, you will see that I opted to tuck in my shirt on several of the shots.

The skirts in the booklet are intended to be long. I give instructions for lengths 32, 34, and 36 for you tall gals! If you want to make a shorter skirt, you can always shorten your panels before tapering them.

I have placed the skirts into 4 groups: plain, gathered panel, godet, and pleated. Below are the details for each skirt included in the booklet. Just think of all the great skirts you can get from one set of simple instructions! The possibilities are endless...truly!

Plain, with bias trim between panels and hemband
Michael Miller Waterfront Park fabric
 
Colorblock with Moda Bella solids
 
Amazing Technicolor Dream Skirt with Moda Laundry Basket "Over the Rainbow" batiks
 
Gathered panel (set of 3 at center front and back) from brown linen
 
Gathered Panel (alternating), Free Spirit Tina Givens fabric
 
 
Godet, 3 at center back
Free Spirit Anna Maria Horner Hand Drawn Garden fabric
 
Alternating scrappy pieced godets, gray linen skirt
 
Godets between each panel
Alexander Henry fabric with Amy Butler godets
 
Box pleats (3 at center front and back)
Robert Kaufman cotton chambray
 
Alternating box pleats,
Moda dot, Alexander Henry large dot on pleats
 
Box pleats between each panel
Moda Lush Uptown fabrics
 
 
Lots and lots of skirts.......have fun with it!
 
Happy Sewing!


October 16, 2013

Fall 2013 Collection: Meet Jordan!


The Jordan Jacket: Silver Metallic Linen with vintage glass and rhinestone buttons


The next reveal is the Jordan Jacket! I was noticing how much the classic denim jacket was showing up in fashion these days. To tell the truth, the style of this particular jacket never goes out of style...it is truly a classic. I had some fun with the fabrics on this one and show it to you made up in wool, linen, and cotton sateen. It really is so versatile! You could make it from velveteen or corduroy as well. Even a heavy silk would be fabulous!

The details are what make this jacket special. I took special care to give you the set in pockets so many of you said are important to a jacket. I think you will find that the pockets are great for stashing your phone or whatever other small items you may want to carry. The upper pockets are fully functional as well, but of course they are small, which is how it is with these types of jackets.

This particular jacket is unlined, so you don't have to worry about messing with another layer of fabric. I also designed it so that there are no facings to deal with either. The front facing is built into the front pattern pieces, so it will be folded around to the wrong side.

Don't let all the detailing intimidate you! This jacket does take some time, but the steps are very manageable. I highly recommend that you have a serger handy so that you can finish off your seams neatly. After all, they will be seen on the inside of the jacket. I think the choice of buttons for this jacket is very important. For most of the ones seen here, I chose vintage buttons from my personal stash....I'm a bit of a button hoarder!

As with all of my patterns, how much detail you decide to add is your choice. If you don't want to do some of the pockets, you can always opt to leave them out. I encourage you to make the pattern uniquely yours.

Here are some images of the different jackets I made along with some fabric details.

Metallic Denim (just a bit of a sheen...love that!)
 
Houndstooth Wool and Heavy Silk for the contrast
 
Free Spirit Tanya Whelan Petal Home Dec Cotton Sateen fabrics
 
Here's the back of the jacket. Notice how I fussy cut the fabric to showcase the motif.
 
Westminster David Butler's Parson Grey World Tour linen fabric
 
So, there's the Jordan Jacket!
Again, we will have this pattern and the rest of the new items up on the website later on this week.
 
Happy Sewing!


October 15, 2013

Fall 2013 Collection: Meet Ramona!


 Ramona Wrap Dress: ModKid Fabrics (available at JoAnn Fabrics)
 
Hey All!

It has been busy, busy here at Casa Serendipity. In addition to creating the new fall line, I went to Denver last week to tape with Ellen March for a spring 2014 show of Sew it All. This is a great sewing show that airs on PBS. I was asked to write an article about working with lace and specialty fabrics for Sew News, so I designed a great party dress using these fabrics and we show the construction and discuss helpful tips on the show. As we get closer to air date, I'll be sure to keep you all updated.

In addition to that, I'll be at the Original Sewing Expo show in Fort Worth this weekend, starting on Thursday. There will be two fashion shows highlighting my designs, one on Thursday at 2:30, and another on Saturday at 1:45. This is the WEEKEND BEFORE MARKET, people! I guess no one really looked at that part of the calendar of events...this is the craziest time of the year for me and lots of other designers! Having said that, I will be at the show ONLY on Thursday to emcee the fashion show, then I'll be in my friend Lorene's booth (Sew it Up Studio) to sign books and talk to folks. Please stop by if you will be at the show and say hello. I would love to see you!

The last weekend of the month will be market in Houston, as it always is. I think we are nearing our 20th market. It is hard to believe we have been doing these shows for so long. I still get so excited and energized at these shows! There is so much to see and so many good friends to visit with...lots to look forward to. Then, the holidays will be just around the corner. Where did the year go? I am sure many of you are asking the same question.

Well, enough of my nonsense, you came to see the new stuff, right? Well, there will be 4 new designs revealed, so this is part one. The new inventory is expected TODAY, so we'll be busy getting these listed on the website this week so you can get those orders rolling in. I am excited about this new collection and hope you will be as well.

We did the photos mid-September at my brother-in-law's lovely home in Southlake. He is quite the landscaper and does all the work himself. It is beautifu1! We feel very lucky that they gave us free run of the place to do the photography. We felt like we were at a resort! Now if we just hadn't had to work so darn hard!

The first design I want to share with you is the Ramona Wrap Dress. This is a super quick design to stitch up. There are only 5 pattern pieces and NO facings, zippers, or buttons! Can you believe it? The edge of the dress is finished off with a bias binding. I have also given you some options with the length of the skirt and sleeves as well as ideas for adding a contrasting fabric to the front of the skirt. I love this dress! It came out just as I intended. It is perfect for any time of year and I really love wearing my fall dresses with riding boots...the HOT fashion item of the season. I think the real reason I love those boots so much is that they are not high heeled! My feet have gotten so used to being bare that they simply refuse much of a heel.

Here are some images of the new dress....and the details on the fabrics I used.

Moda Half Moon Modern ZigZags
 
Westminster Philip Jacobs floral
 
Cloud 9 Organic Cotton, Dem Bones
 
Westminster Martha Negley floral
 
Free Spirit Anna Maria Horner Hand Drawn Garden
 
So there you have it! The first design for Fall 2013. The rest of the reveals will be coming this week. We will have these available for sale later on this week. Stay tuned!
 
Happy Sewing!


July 29, 2013

Winner!

Thanks to all of you who left a comment for the giveaway!
According to random.org, our lucky winner is Julie P, who said:
 
 
This book is adorable. I just recently started embroidering and I would love to have this book.
July 28, 2013 at 7:18 PM
 
Congratulations!
Please send me a message here with your address and I will get your book out ASAP. Enjoy!!

July 25, 2013

Stitching for the Kitchen Book Review and a Giveaway!

This Giveaway is now closed. Thanks for your comments.
The winner will be announced today!

Hey All!

Hope you have been enjoying your summer. It has been busy here with so many things! We have enjoyed a somewhat cooler summer than what we have had the past couple of years, so we are super grateful for that.

I was sent a delightful book in the mail from Sixth and Spring several weeks ago to review and share with you all. It is Gooseberry Patch's newest publication, Stitching for the Kitchen! It is packed with all sorts of wonderful projects, everything ranging from hand embroidered items to a carrying case for your sewing machine!


The first thing I noticed about the book is the binding. I love the concealed spiral binding since these types of books are just so darn easy to use. I also love that the full size pattern pieces are only printed on one side so you can go ahead and just cut out what you need. Fabulous!! The instructions are well written and easy to follow, plus there are illustrations to help along the way. The book is packed with great photos that are bright and cheery.

I decided to make a project from the book with some fabric I had lying around. I decided to use Spring House from Moda for the handy Market Tote Bag. The construction is very simple so it goes together rather quickly. I think it would be ideal for carrying to the farmer's market or to your favorite grocery store to gather up the freshest foods for enjoying at home. Of course the beauty of using a fabric bag is that it can be used over and over again, so it is friendly to the environment. You can also just throw it into the wash whenever it needs it. I plan on folding mine up and stashing it in the car to have handy the next time I need some groceries.
 
 
Because I can't help myself, I used more prints than what is called for in the pattern instructions. I had 4-5 prints from the collection and didn't really have enough of any one particular fabric to completely satisfy what was called for in the supply list, so it was a perfect opportunity to scrap this bag around a bit.

Here is my result! I think it turned out quite nicely. I will definitely be taking it with me the next time I go to Whole Foods (my favorite grocery store, by far!). I didn't realize how much this bag would hold until I got ready to fill it for the photo....wow! It really does hold a lot and I like the way the handles are added. At first, I didn't really get why they continued around from one side to another as it seemed that it would be awkward to carry, but the contents do travel well with them sewn this way.


I took only one other liberty with the design and added interfacing to the handles. If you want to do this, just cut 6 - 3" wide strips and add it to the wrong side of two sets of the handles (I added it to the side that would face out), then sew together. I think it makes for a sturdier handle.

One other word of caution...when I was cutting out the pattern, I noticed that the pocket pattern piece said to cut 2. You really need 6, so be sure to do that. You have plenty of fabric from the requirements, so don't fret about that part. I thought that was only a minor error and one that you would easily realize once you start to make the bag...no big deal!

Now for the GIVEAWAY!
I'll be sending a copy of this book to ONE LUCKY WINNER!
All you have to do is leave a comment about why you would like to own it. PLEASE leave only one comment per person. Any additional comments from the same person will be deleted to keep this fair for everyone. The giveaway starts today and will run through Sunday, July 28th at midnight, CDT. Don't delay, leave a comment today!!

If you would like to increase your chances of winning this book, don't forget to visit some of these blogs later on in the week and into next week.

July 22


July 23


July 24


July 25


July 26


July 27


July 28


July 29


July 30

Gramma's In the Kitchen

August 1


August 2

Delightful Country Cookin


Happy Sewing!

May 2, 2013

Patterns for Sale!


We posted the new patterns to the website last night. We also posted an announcement on Facebook last night, but for those of you who do not follow there, this is your official notice! For those of you who have already ordered, we sincerely thank you...your patterns are going out today, so get your fabric and machine ready to go!
 
Happy Shopping and Sewing!!
http://www.sewserendipity.com
 

May 1, 2013

Spring 2013 Collection: Meet Naomi!

Today is the last reveal of the new spring collection. The Naomi Dress is my latest design that has NO CLOSURE! Yes, it is like Claire and Diane as well as the Fashion Formula Dresses in that there is no zipper or buttons to worry about! This makes for easy construction and fit, as you adjust the elastic waist to fit you the way you want.


Maxi Length with dipped back hem, Westminster fabrics: Joel Dewberry's Notting Hill

Design details include 3 small pleats at the front neckline which helps to provide the fullness for the bustline. The back neckline features an optional keyhole detail. You can always opt to just cut the back bodice on the fold and not cut the keyhole for an entirely different look. The cap sleeves are cut on the bias with the lower edge of the armhole finished with a bias binding. The waistband fits a little under the bust but not as low as the regular waistline. The front of the waistband is not elasticized, creating a smooth silhouette to the front of the dress. The slightly A-line skirt is roomy without being too full and offers 4 different hemlines: tunic, knee, mid-calf, and maxi, so not only can this design be a dress but a darling top as well! I have also provided a separate back skirt piece that has a dipped lower hem. This hem is not as exaggerated as some of the hemlines in current fashion, as I wanted it to be subtle and noticed from the side and back, but not tremendously from the front.


Mid-calf length with dipped back hem, Fabric: Moda's Happy Go Lucky by Bonnie and Camille

As always, I have provided many ways for you to change the look of the dress just by changing the fabrics or adding a few details here and there. I love the way this design can take on the look of a skirt and blouse simply by making the bodice from one fabric, the skirt from another, and then set the whole thing off with a contrasting waistband and hem.


Knee Length, Fabric: Michael Miller's Cosmos by Laura Gunn

I also played around with layering fabrics for the skirt. I used some textured whites and eyelets that I had, but this would be lovely in rayon or cotton voile as well.


Knee and Mid-calf length layered with dipped back hem, Fabric: my personal stash of textured whites, trimmed with wide eyelet lace

This design is very forgiving with the roomy skirt and elastic waist. The bodice is roomy enough for cup sizes A-D without alterations, so it will suit a variety of body shapes and sizes! The pattern includes full instructions and details about my variations, as well as full size tissue sheets with a range of 7 sizes.

 
Knee length with back dipped hem, Fabric: Michael Miller

Again, we are in the process of posting these new patterns to the website. Look for them to be available in the next couple of days. If you would like notification of when these will be available, all you need to do is be sure that you have an account set up with us (no need to set up any payment options when you do) and check the box to receive our newsletters. That way you will know when these are ready as well as any sales or promotions that we are doing.

Happy Sewing!

April 30, 2013

Spring 2013 Collection: Meet Bijou!

Today is the second big reveal of the spring collection. Some of you might recognize Bijou from a few years ago! The pattern had gone out of print but I still had customers asking for this one so I decided to see if I could add some more sizes, tweak the design a little, and offer it again. My sewing/design math worked out beautifully so here they are, the Bijou Travel Trio!


I love to think of these bags as a lovely set of soft-sided luggage that you can customize to your liking with any fabric you choose. One of the things that I did to make the bags suitable for today's demands is to add a great padded exterior pocket that zips. On the medium and large bags, this pocket is large enough to accommodate a tablet computer such as the Microsoft Surface or iPad. The small size has a pocket to accommodate any regular size eReader or mini-tablet computer. Because this pocket is exterior, access is easy at the airport where you need to be quick to get through security! If you haven't used Soft and Stable yet, this is the product I used to pad the pocket and I love the result. Because the outside of the bag is made with Peltex, this pocket gets the benefit of that protection as well, so no worries about damage to your precious electronics here!


The largest size bag is the original size from the "old Bijou" pattern. I changed up the pockets by adding that snazzy outside zippered one and then added a smaller zippered pocket on the inside as well. These bags are surprisingly roomy and they hold a lot. From my previous experiences traveling with the largest size, it lays on its side well to slide under the seat in front of you when flying. I love having access to my stuff on the plane and this way you don't get dirty looks from the flight attendants!
 
I am excited about the medium and small sizes too! The medium is a great size for when you need to carry a little less. It is still very roomy and allows you to carry your computer safely. It would be a great project bag if you like to do needlework or carry around books, magazines, paperwork, or even snacks! I am planning on making myself a set to take to market. The largest will be used for flying and then the medium for carrying around our paperwork to and from market. The small will be great for carrying just the incidental items.


When I designed the smallest size, I thought about how cute it would be for a little girl to have a bag like her mom! It is small enough for a young girl to carry around and just think what she could put inside...doll clothes, books, craft supplies, snacks! It would be adorable!


One of the best features about this set of bags happened rather upon accident. Once I had finished a set, I needed to set them off to one side and get them out of the way of my sewing chaos. I realized that they will all nest inside one another! This is a wonderful storage solution for when you are not using the bags. You can have three bags in the space that one takes up! This is how I will ship the bags to and from market for the booth....perfection!

The sizes for these bags are as follows:
Large: 18"w x 12"h x 6" d
Medium: 15"w x 10"h x 5"d
Small: 12"w x 8"h x 4"d
 

One set of samples shown here were made from Michael Miller's new home decorating cotton sateen, Bekko. I love how the gray and white prints play together. The other set was made from Echino linen. For those of you not familiar with this fabric, it is a fantastic line of Japanese fabric. They always have such interesting designs. I find myself drawn to them often! The last bag shown in the pattern is a stand alone bag in the medium size and that is  Michael Miller fabric, Secret Garden by Sandi Henderson.


This bag design is for the intermediate to advanced bag sewer. It is constructed from Peltex with a fusible fleece zipper panel at the top. You could make it from a different stabilizer, but it will not have the same substantial feel that Peltex yields. I also advise that if you want to have an easier time making these bags that you use quilting weight cotton. The heavier fabrics do make the seams bulkier and usually mean that you need to use a denim needle in your machine. Time and patience are key here...but I promise that it isn't as hard to make as the Weekender....we all know the one I am talking about!

The pattern features many illustrations to get you through the construction process along with tips to get the bag just right as you sew. There is a large paper sheet with the pieces printed on it. You will find that it is double sided. I did this because I really want you to trace your patterns onto freezer paper. This is how I make the bags myself. I love that I can lightly iron the shiny side of the paper to the stabilizer to cut it out. It is quick and accurate without having to pin anything, and once you have made your templates, you can use them over and over again.


As I mentioned yesterday, we are in the process of adding the new patterns to the website. These will go live later on this week as I want to get through introducing you to all the newbies before we sell them!

Happy Sewing!