October 6, 2011

New Fall Collection: Meet Savannah!


The last new design in the fall collection is the Savannah Swing Jacket. Featured in two lengths (hip or fingertip), this jacket has a slight flare that floats away from the body for great and stylish swing! The sleeves are 3/4-bracelet length with many options for finishing out the cuff. You can choose a contrast turned cuff, ruffle, narrow band, or plain band with an optional button trim. The bodice has variations for double or single pleats as well as a squared or rounded front. The collar has a few options too. You can make it from the same fabric, contrasting fabric, or ruche it for great added textural interest.


For those of you who have been wanting a lined jacket, here it is! I have included full instructions for lining the jacket as well as an option to leave it unlined for those of you who would like a lighter weight jacket or maybe you just aren't ready to tackle the whole "lining thing" just yet!


This jacket is just fabulous made up in lovely textured heavy silk, wool, home decorating weight twill or sateen, and linen. It is best to stay with a heavier weight fabric for the jacket so that it hangs appropriately. This is one of the few times that I would recommend that you NOT use quilting weight cottons. There are so many wonderful heavier fabrics available that I am sure you will find something fabulous to make your jacket from.


You will notice that I also chose to mix it up a bit with my buttons. I have placed covered buttons on several, varying the size based on my whim at the time of making the jacket. Sometimes the buttons match, covered in the same fabric as the jacket, and sometimes they are made from contrasting fabrics. I also found some great accent buttons too, so don't be afraid to mix two different styles of buttons or more on your jacket. Let this design speak for your personal style!


It looks like we will be able to get these patterns listed very soon, so watch for next week when they will be available for purchase!
Happy Sewing!!

September 29, 2011

New Fall Collection: Fashion Formula Skirts, Volume 2!

The Fashion Formula Skirts booklet that I released last fall was so popular, I decided to see if I could come up with another volume of easy to sew skirts. I had so much fun coming up with new ways to get a cute skirt from just strips and rectangles! If you are familiar with the first booklet, there are NO pattern pieces required as all of the skirt pieces are cut with a rotary cutter, ruler and mat, based on your hip measurements. There are four designs in the new booklet and all of them feature a yoke and the option of an elastic or drawstring waistband.

First up is the Jolie Pouf Skirt. This is a double layer skirt with simple pleating along the lower edge of the overskirt to create the scalloped edge. I love to use high contrast fabrics for this skirt. I think that it would be fabulous in cotton voile. Little covered buttons or fabric flowers at each scallop would be a lovely added touch as well.


Next is the Gabrielle Godet Skirt. This one is made from tapered panels with the insertion triangular godets between along the lower edge. The black version has eyelet fabric for the godets and lower edge ruffle trim. It is fun to mix textures of fabric with this one. I think a beautiful skirt could be made from a lovely heavy silk with lighter silk (maybe dupioni) godets. It would also be great made from linen or a lightweight wool or twill for a wonderful fall look. I also included covered button accents above each godet on one of the skirts just to add a little more detail.


The Corinne Pleated Skirt is made from pre-cut 2 1/2" strips, or you can cut your own. This is a great way to use a pre-cut strip roll, if you have any lying around. You get to enjoy the whole collection of fabric all in one skirt! I have included options for a contrasting hemband, frayed seams for a shabby look, and one skirt that I cut the strips from two fabrics to get a great alternating pattern.


The Adrienne Pieced Skirt is the last in the group. This design uses the technique of paper piecing. Don't be afraid if you have never done this before, as it is a snap to do! I chose a diagonal pattern for my panels so the skirt would have a chevron pattern when sewn together (reminiscent of the Missoni craze going on right now). I just used my extensive stash of black and white fabrics and put a pop of color in each panel as I went along. I love the result! I think it would also be fabulous done in bright colors with a pop of black here and there. This is a fun skirt to make with endless possibilities on the piecing aspect. It is a great way to use up that stash of little scraps you have!


We should have the booklet in stock very soon....will let you know as soon as it arrives!

Happy Sewing!

September 23, 2011

New Fall Collection: Meet Madeline!


The first of the new fall collection is the Madeline Maxi Dress. I designed this one for myself this summer as I found that most of the maxi dresses were just too crazy and loose for my liking. Once it was designed I just loved the way it came together, so I decided that it had to be a pattern! I love wearing this dress and it never fails that I get compliments everywhere I wear it...you will too!

It is a snap to sew together. The waist is slightly raised to give you the slimmest waistline profile and you have two choices for the skirt length. Several choices are offered for the hemband. This dress zips up the back and if you follow my tutorial for inserting the invisible zipper, you will be feeling like Super Seamtress!! As usual, there are numerous ways for you to mix and match your favorite fabrics to make your own unique creation.

Here is a gallery of the shots taken for the pattern cover. I am doing the full leaflet for the pattern again so you get a lot of different images as inspiration. This design is currently at the printer and should be here within 2 weeks. We will be sure to let you know when it is available for purchase.


Next week....some new skirts!!

Happy Sewing!!

September 21, 2011

It's Here!


Just wanted to check in really quick and let you all know that the new book, Sew Serendipity Bags just arrived here yesterday. It is up for sale on the website and signed copies are ready to ship! Go here and order yours right now!!

The book is beautiful and completely packed with great designs and techniques. It is the perfect companion to Sew Serendipity and I just couldn't be prouder!

I can't wait for some of you to get some projects made and posted to the Facebook page. It is always so fun to see what all of you come up with. I am so grateful to all of you for purchasing my designs and making them your very own. This book is even dedicated to all of you as a token of my appreciation!

Here are a couple of shots from the new book to whet your appetite:


The Socialite Handbag


The Laptop Messenger Bag

The new book has projects to suit everyone's skill level as they are divided into sections: Simple, Intermediate, and Challenging. I have built in skills and the use of lots of great tools to make your experience an enjoyable and successful one.

I will be introducing the new fall designs in the coming days that will be available starting mid-October, so stay tuned!

Happy Sewing!!

September 10, 2011

We Have A Winner!

I just entered the numbers on random.org and we have a winner for Nancy's book!
It is #47, Kathryn!
Kathryn says, "My sewing career started as a garment sewer in 4H. I still love it. Nancy is a favorite of mine on PBS." 

Posted August 27, 2011 3:49 PM

Congratulations, Kathryn! Please contact me here and send your mailing address. I just know you are going to love Nancy's book!

Stay tuned! I am putting the finishing touches on the new patterns before they go to print....sneak peek VERY soon!

Happy Sewing, Everyone!

August 31, 2011

Craft Buds


Just a quick note to tell you all about a great blog called Craft Buds: Growing Your Handmade Business! Lindsay has some really informative posts about lots of topics to help you be successful with a homemade business. If you haven't stumbled upon her site before, you should go check it out.

For the month of September, she is going to be hosting Craft Book Month, an event to celebrate all things craft books! She's got excellent guests lined up (publishers & authors, including me to talk about my upcoming book, Sew Serendipity Bags at the end of September), weekly giveaways, book reviews, and more.

As part of the month-long celebration, she is also hosting a linky party with additional giveaways. This event will answer some questions for aspiring craft book authors---and inspire everyone to use those pretty books sitting on their shelves to make projects.

I'll be back soon to give you a sneak peek of the fall collection. Gotta get into the studio and finish up some sewing...photography session is this weekend! Then on to finalizing pattern pieces and writing instructions....fun!!

Don't forget to leave a comment for the giveaway of Nancy Zieman's new book on the last post if you have not already done so. You have until Sept. 9th at midnight (CDT) to enter!

Happy Sewing!

August 27, 2011

Nancy Zieman Sewing A to Z Blog Tour and a Giveaway!


THIS GIVEAWAY IS NOW CLOSED!

It is my turn to host the tour for Nancy Zieman's new book, Sewing A to Z. Nancy has really outdone herself this time by addressing just about anything you have ever had a question about regarding sewing! Seriously, this book is an amazing resource for all kinds of techniques that we tend to forget how to do after a while...or maybe I am just speaking for myself here. I never can remember how to miter the binding on a quilt....oh wait, I know why, it is because I hardly ever do that being a "poser" quilter! (By "poser", I mean that I really don't have the attention span or accurate enough 1/4" seams to get through a large quilting project.....just sayin'!) Never fear, Nancy has covered how to add that pesky binding and how to make it look professional.

That is probably my favorite thing about Nancy...she is a sewing professional in every sense of the word. I love her clever techniques. They save you time and the result is always perfect.

Here are the two techniques that Nancy addresses in her new book that really stuck with me the most:
1. Darts: I have been making darts in clothing for years, but it never occurred to me to do the clever thing that Nancy does to keep the line from the point to the edge of the fabric perfectly angled...she uses a piece of thread as a guide....now that is ingenious! I always "eyeball" it and most of the time it works, but this thread technique works EVERY time! Thanks for that one, Nancy!
2. Easing: There are a couple of places that Nancy addresses easing seams together. This is such an important technique to master, especially when making clothing. There are a lot of times where a seam will need this type of treatment, such as for sewing princess seams or adding a set-in style sleeve. Nancy gives you at least three different techniques to try. I love that she tells you that you might need to practice a little bit to get the technique just right. It does take some practice with easing before you are comfortable, and Nancy puts you right at ease.

The book is arranged as you would think. Since it is literally sewing A to Z, the techniques are alphabetized. This is great because it is like the book is already indexed! Have a question about zippers? Go to the "Z" section. Want to know about facings? Go to "F". Super easy and very well illustrated. Nancy is right there also with helpful tips throughout putting you at ease, which she does so effortlessly.

Be sure to go to Nancy's post, as she has a HUGE giveaway of goodies and you have to visit there to leave a comment in order to be entered.


I am also hosting a giveaway here, so be sure to leave a comment if you would like to win a copy of this wonderful resource book. I guarantee you will love it! It is destined to be your go-to book whenever you have a sewing question. The giveaway here starts now and a winner will be announced on September 10. Please submit only one comment to enter.

Here is the full tour, so be sure to check out everyone's review. There are some great ideas, tips, and even a video or two along the way.

Sewing A to Z blog tour:
15-Aug Nancy Zieman’s blog
16-Aug Whipstitch
17-Aug Sew Mama Sew
18-Aug Diary of a Quilter
20-Aug Amy’s Creative Side
22-Aug Quiltville
23-Aug Crap I’ve Made
24-Aug Eileen Roche’s blog
25-Aug I’m Just a Guy Who Quilts
26-Aug The Free Motion Quilting Project
27-Aug Sew Serendipity
29-Aug Lazy Girls Designs
30-Aug Pat Sloan Blog
31-Aug Tallgrass Prairie Studio
1-Sep True Up
2-Sep Sew News
6-Sep Off the Cuff Sewing Style
7-Sep V and Co.
8-Sep The Cottage Home
9-Sep Colette Patterns

Happy Sewing!

August 22, 2011

Back to School and Sneak Peek!

OK....I admit, it has been a while! We have had such a busy summer around here! A bit of this and a bit of that have kept me from blogging much. It has been unbelievably hot here in Texas and we have worked hard to keep everything alive and ourselves cool. I know that many of you can relate!

I am working on new fall stuff for market (stuff you are going to LOVE)....the Sew Fresh group over at Cabbage Rose got to see a little bit, but I have been a busy girl since then and have yet another design worked out. There will be a new Fashion Formula Skirts booklet (part 2), a new dress, and a new jacket, finally. They are great and I can't wait to get the photography done so that I can share with all of you!

I do want to let you know about a great "Back to School" series over at Sew Sweetness. Sara graciously asked if I would like to contribute and I agreed to do one of the posts. Mine will be up on the 25th (that's this Thursday) and I will be talking about the importance of adding facings to your clothing projects. I hope you will hop on over and read all about it. There are many other great posts going on, as the series started a week ago. I have a button on the right hand column here for you to go straight to the series, or you can click on the hyperlink above too. I hope you all find valuable information and inspiration there!

Now for the sneak peek.....my advance copies of Sew Serendipity Bags got here today!! Yipee!! It will be another month before the book will be in your hot little hands, as they are all on a literal slow boat from China at the moment (no kidding)! We expect the books to be in-house at the end of September and will be adding a pre-sale option around the first to middle of September. We will send out a little note as soon as we have that available for you. I am just so thrilled with the book. It is a perfect "sister" book to Sew Serendipity. You can expect great techniques that I personally use, invaluable resources, the same wonderful hand drawn illustrations and lots of fun bag designs to play with.
Here is just a taste of the book to come....


Happy Sewing!

July 5, 2011

Where I Sew

Hope you had a wonderful 4th of July holiday. We had some good friends over for a smoked brisket feast on Sunday, then took it easy yesterday. It was a glorious weekend! A special thanks to all of the men and women who are members of our military, keeping us safe and free.


I just wanted to let you all know that my sewing studio will be featured on Pink Chalk Studio's blog this month! Kathy is doing a feature on many designers in the industry to show where we work as inspiration. You can even post a photo of your own sewing space on the July 2nd post!

My studio will be show on July 16th. You can currently see Jennifer Paganelli's sewing studio on the July 3rd post. Just click on the hyperlinked text in this post or on the sidebar to navigate to Kathy's blog to read all about Jennifer's space. See the list below for other designers who will be featured:

Sunday, July 3        Jennifer Paganelli
Wednesday, July 6    Tricia Waddell
Thursday, July 7        Betz White
Saturday, July 9        Brigitte Heitland
Sunday, July 10        Peter Lappin
Wednesday, July 13    Rita Hodge
Thursday, July 14    Sarai Mitnick
Saturday, July 16        Kay Whitt
Wednesday, July 20    Aneela Hoey
Thursday, July 21    Kate Spain
Saturday, July 23        Alissa Haight Carlton
Wednesday, July 27    Jan DiCintio
Thursday, July 28    Pat Sloan
Saturday, July 30        Jacquie Gering
Sunday, July 31        Kathy Mack

I am about to embark upon some magazine project sewing, then full on into the fall collection. I appreciate all of you who have posted your creations to the Facebook page. It has been so fun to see what you all are up to! I know it inspires so many to get busy and turn that fabric stash into something fabulous!

Until next time, HAPPY SEWING!!

June 21, 2011

Winners! & Come see me!

Thanks to everyone who left a comment. I read each and every one and I am thrilled that so many of you are sharing my passion for sewing! Thanks so much for your kind words about my work. All of that positive energy really made my day! Using www.random.org, here are the two lucky winners:

 #152: Lori Anne said,
"I just purchased 3 of your patterns to use for my 23 yo daughter and would love to win these to add to our collection! And since she's also a HUGE Mavericks fan (and yes, she's still up in the clouds too!), it would be so appropriate for her to win! LOL Thanks for the giveaway!"

Posted June 18, 2011 9:45 PM

#41: DD Lindsey said,
"I NEED these patterns because I just recently bought your book and I am SO excited to try 3D sewing for the 1st time (aside from some bags I've made). I know once I start, I won't wanna stop! And I'll NEED more patterns to try! Did I mention that I NEED these patterns?!"

Posted June 17, 2011 12:42 PM

Congratulations, gals! Please contact me with your mailing address and I will get your patterns right out the door!

On another note, many of you who live here in the Dallas/Fort Worth area know that this weekend (starting on Thursday) is Martha's Sewing Market in Arlington at the convention center on Ballpark Way. This is a show that is open to the public and sponsored by Martha Pullen. She is the maven of heirloom sewing and publishes the magazine Sew Beautiful. They did a lovely photo shoot of some of my designs in their newest issue, so go check it out! Here is a sneak peek.....


I will be attending the show as a guest in Sew Southward Bernina's booth, signing books, promoting the new pattern designs, and talking to folks. I plan on being at the show most of the day Thursday and Friday. If you plan on attending I would love it if you would stop by to say hello! Hope to see you there.

June 17, 2011

Spring Market Recap and a Giveaway!


THIS GIVEAWAY IS NOW CLOSED.
Thanks to all of you who left a comment!
OK....I KNOW how late this is! The past month has been a whirlwind of orders, getting organized post-market, a Fabulous win by my beloved Dallas Mavericks (I am just coming down from the clouds on that one!), making the FINAL pass on my book manuscript (Yay!) and about a million other things.


Anyway, just in case any of you might still be interested (and I hope, hope, hope you are), here is a photo recap of spring market. I redesigned the booth this time and went all white for the backdrop. I LOVE how it made all of the samples jump right out at you! I also created a faux shop window at the front corner of the booth and to my surprise, it made the booth almost look circular....very cool! I also made some lovely felt birds to decorate the top of the booth....and I want to clip them all over my house now! I plan on doing this layout again for the fall, so if some of you missed the spring market, you will see yet another version of this design come October.


I thought it would be fun to change the dress forms out each day so everyone would have something new to see and also so the "girls" wouldn't get too bored. It was a lot of fun and there were many who came by each day just to see what the girls were wearing! That was most defnintely a hit!!


So, if you are still reading, I AM DOING A GIVEAWAY HERE! I will be giving out a pack of one each of the new patterns.....that's the Diane Kimono Dress, Betty June Dress, Rita Reversible Bag, and the Camilla Insulated Bag!!
I WILL CHOOSE 2 LUCKY WINNERS!!
(using the random number generator on random.org)

This giveaway starts NOW and will run until 11:59 PM CDT on Monday, June 20th for US residents only. All you have to do is leave a comment about how badly you need these little beauties!


I am so thrilled that so many of you have been following this blog and my Facebook page. I am getting really close to 1000 followers on Facebook! If you have an account and haven't "liked" my page yet, I would love it if you would! You can get to it over there on the right by clicking on my FB icon.


My brain is already hard at work on the new goodies for the fall release...there is going to be some great stuff!

I hope that wherever you are this weekend, you are staying cool and enjoying the "almost summer" season.....


Happy Sewing!

May 16, 2011

Summer of No Pants: A Skirt Tutorial from Sew Serendipity!


Here is my skirt tutorial from my book, Sew Serendipity, as my guest post for the Summer of No Pants. You can sign up for a Sew Serendipity book giveaway here. I decided to start with the Ruffled Skirt and add a pocket from another variation. I used two prints from Poodle, a great collection from Jennifer Paganelli of Sis Boom for Free Spirit Fabrics. The dot is from Michael Miller. I will take you completely through construction according to the instructions in my book. The embellishments are the added pocket, ruffles, and fabric flower.

You may be thinking,"How can I use this?" Simple! You can apply the ruffle idea between seams on ANY skirt or dress pattern as well as dressing something up with a great fabric flower. You might even get industrious and design your own pocket for a paneled skirt. Think outside the box!


Let's get started! First, cut the pieces from the fabric. Notice that the pocket piece is flipped. I only needed the left side pocket and wanted to fussy cut the fabric. That's why I like tissue...you can see through it to do that sort of thing.

Now that the pieces are cut out, it is time to add the fusible interfacing to the wrong side of the facing pieces and sew them right sides together at the sides. Press the seams to one side and serge the lower edge. Set the facing aside for later!


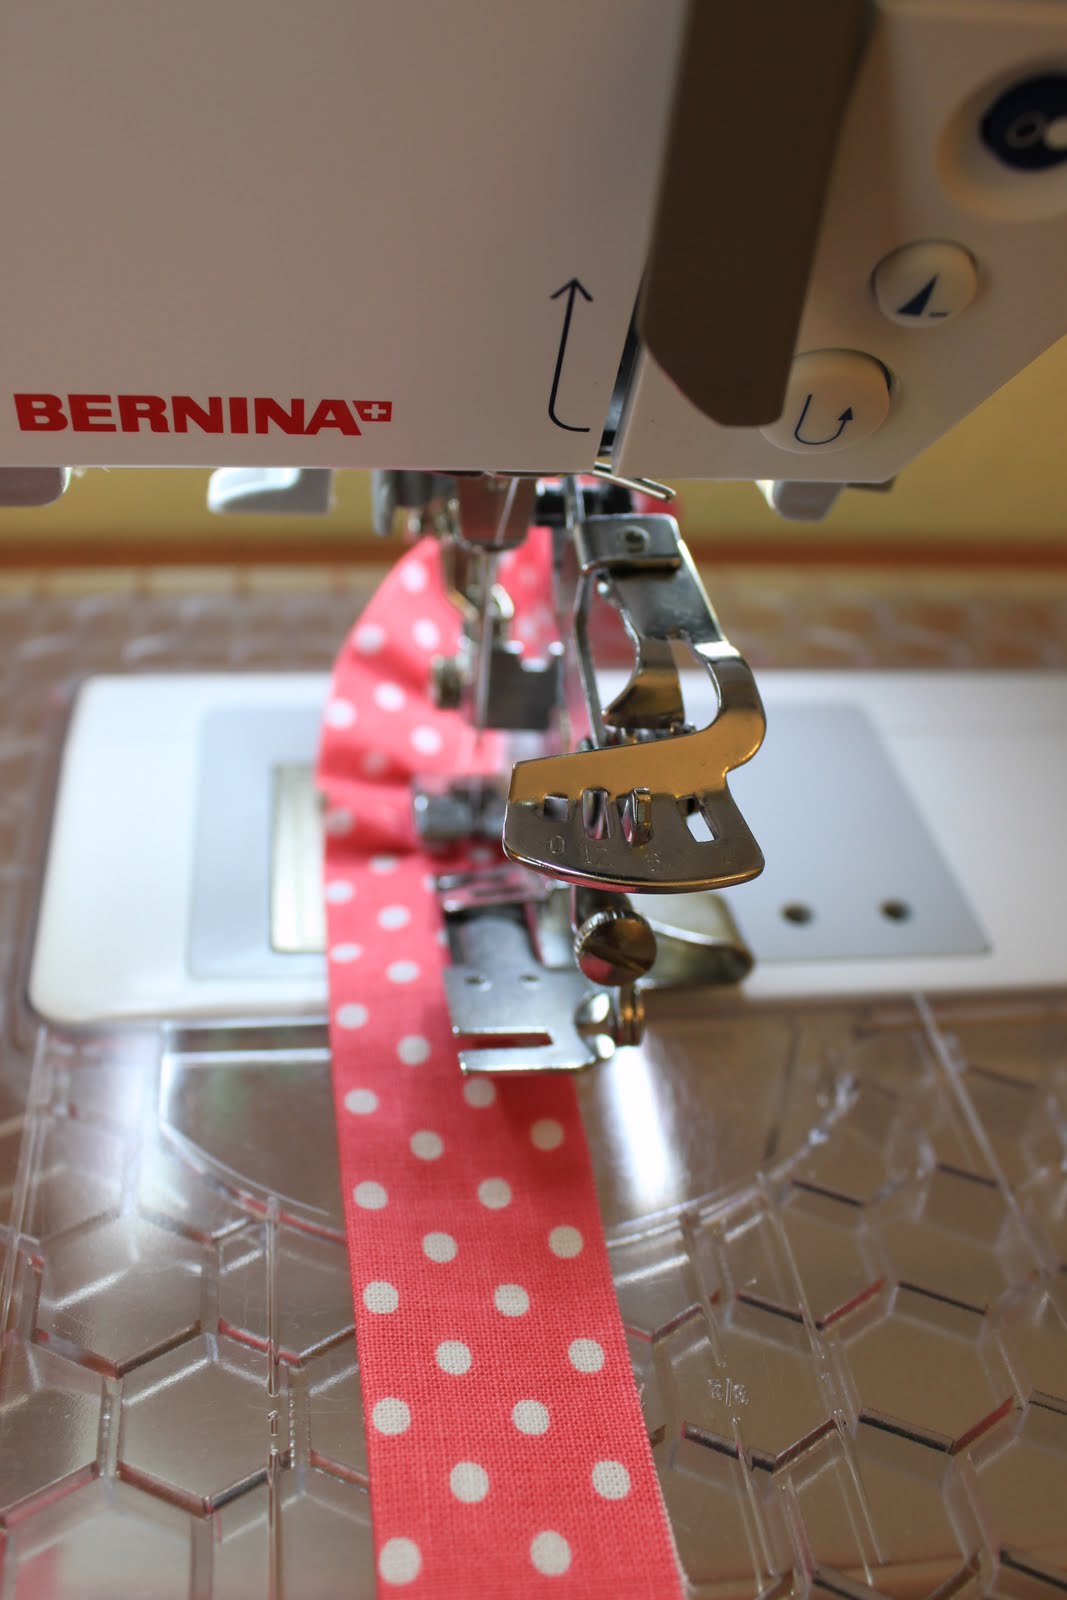
Next, cut some strips for the ruffles. I made my strips 2" wide. Cut off the selvedges, then fold the strips in half widthwise wrong sides together and press.

I used my ruffler attachment set at every 6th stitch and gathered up one of the strips. LOVE this foot! It is worth its weight in gold!

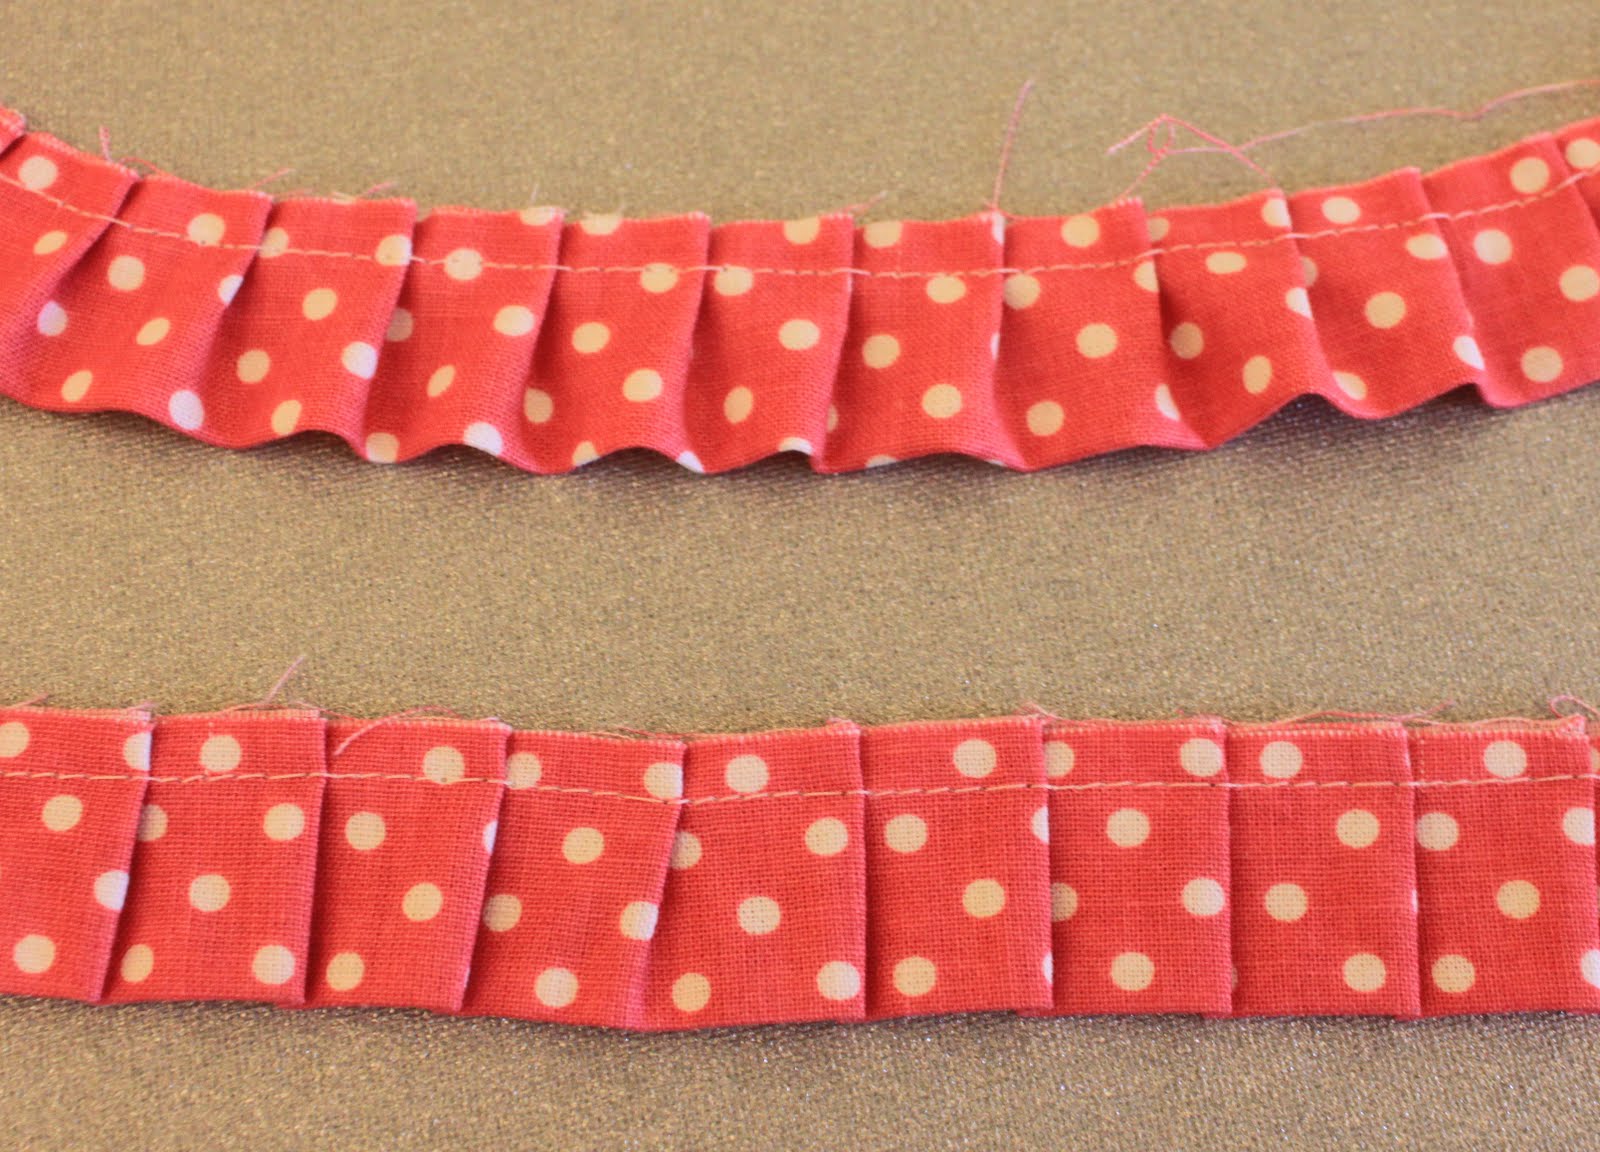
Here, I have shown you the difference between a pressed ruffle and one that isn't....can you guess which is which? This is why I press my ruffles!


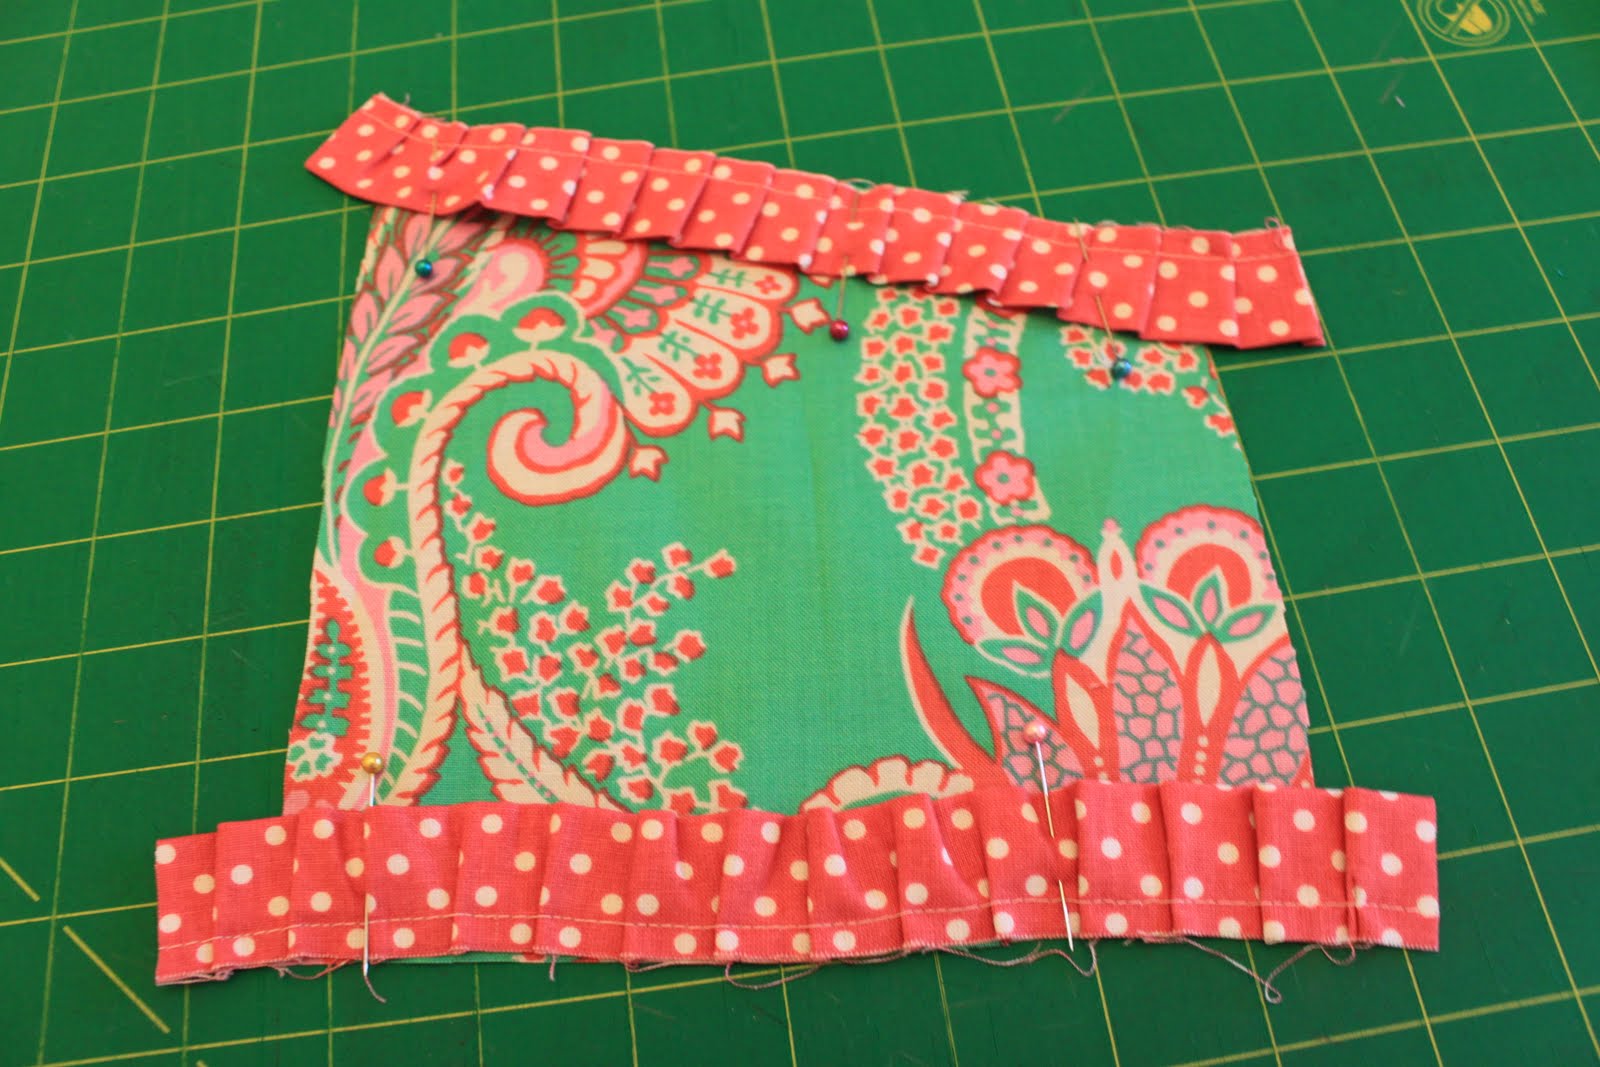
Now it is time to add the ruffles to the upper and lower edges of one of the pocket pieces, against the right side of fabric. I just follow the line of stitching that was created from ruffling the fabric strip.


Add the other pocket piece, right sides together and stitch along the upper and lower edges. Turn the pocket right side out and press, then edge and topstitch the finished edges.


The pocket is added to the left side front piece next. I stitched close to the edge on the sides and on top of previous stitching along the lower edge.


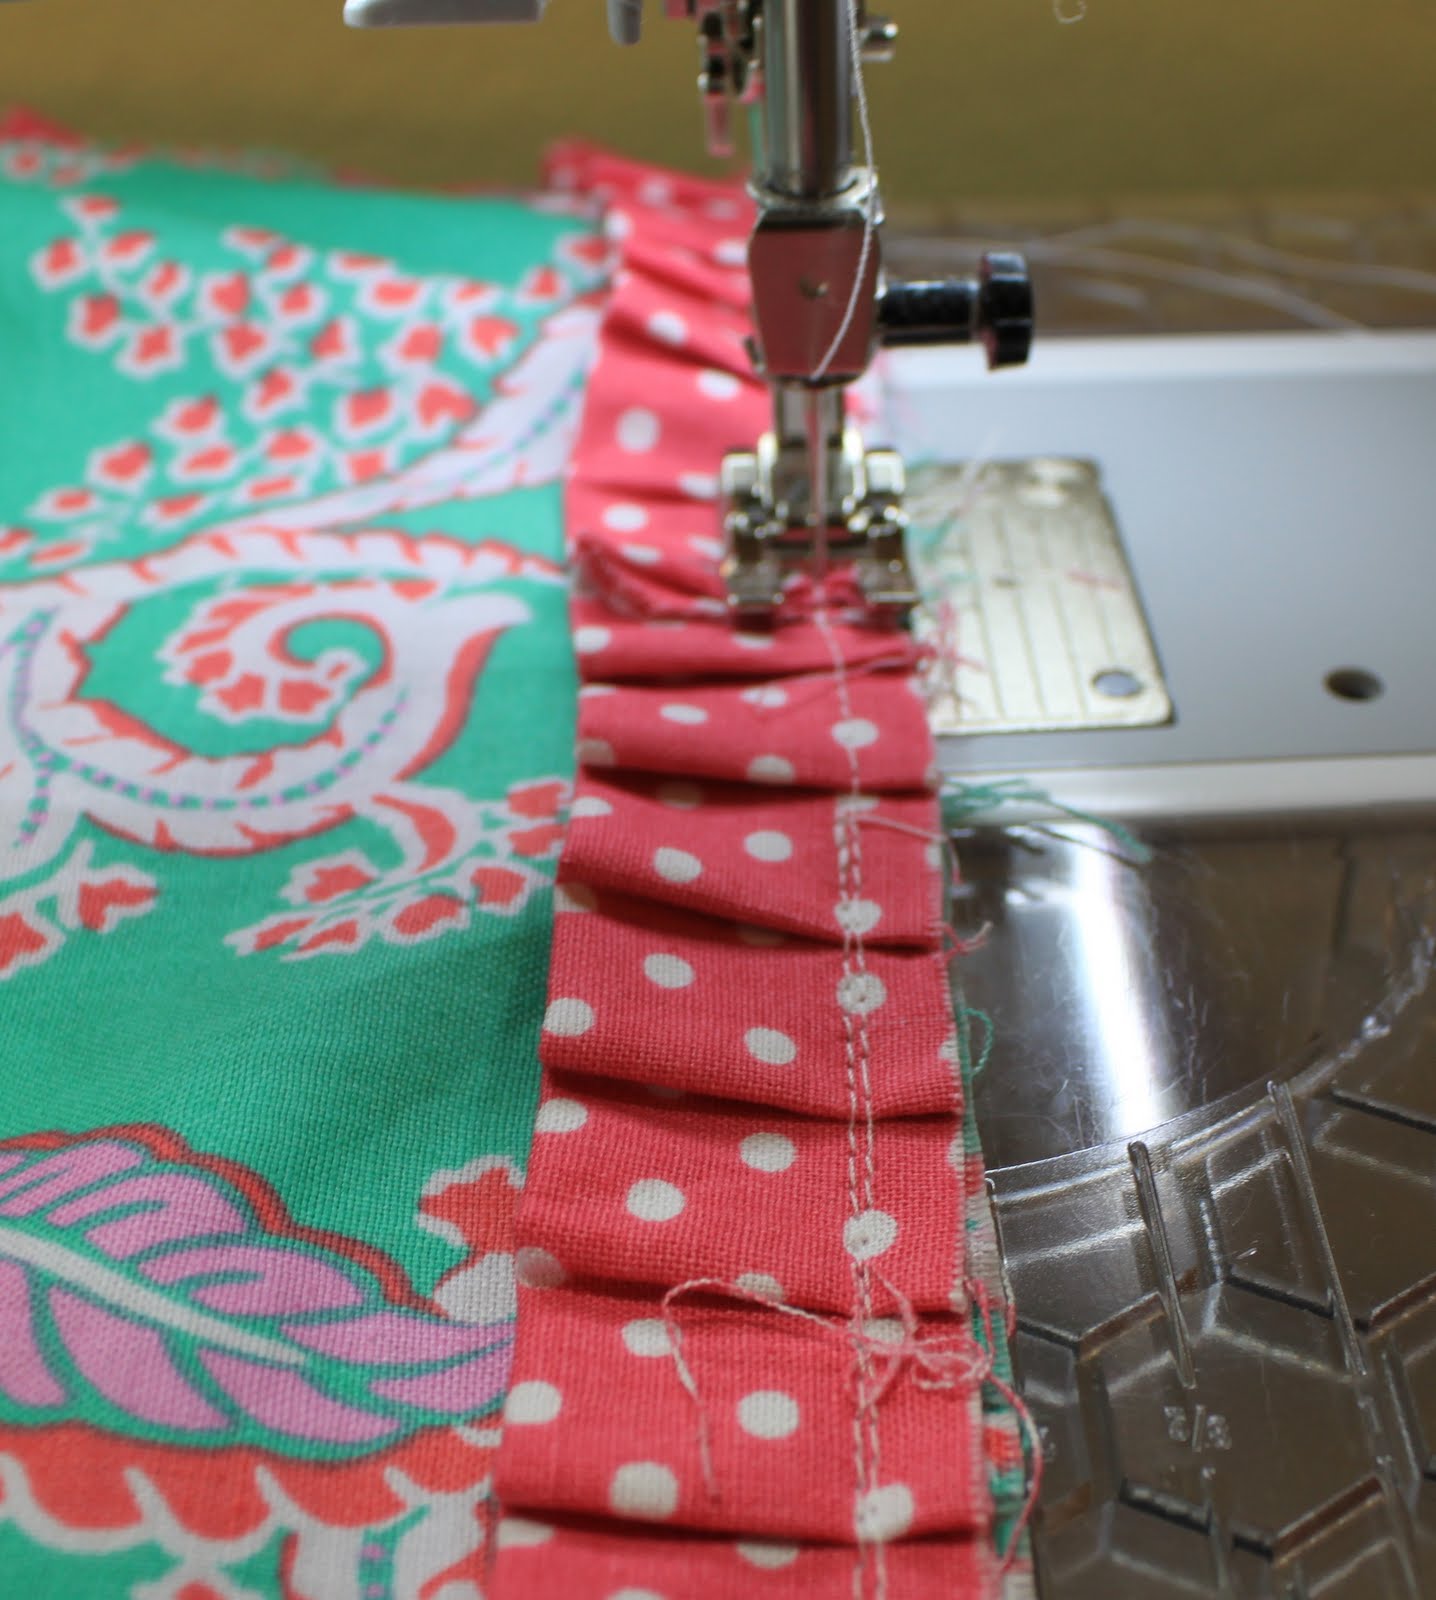
It is time to add the ruffles to the center front and back pieces. Just line up the raw edges with a bit of ruffle extending beyond the upper and lower edges, then stitch in place.


Add the side front and back pieces to the center front/backs. I serge these seams after stitching for a neat appearance. Press the ruffles toward the side pieces, then edge and topstitch the seams. Notice on the center back, the straight edge is serged and ready for the invisible zipper.

I am NOT showing the zipper installation here, but you can visit my "Don't Fear the Invisible Zipper" tutorial on the sidebar. Lots of people have been very successful with their zippers using this method!


Wow....like magic that zipper is in place now! Sew the front and back skirt pieces right sides together along the side seams, then press the seams to one side.

Add the waistline facing to the upper edge of the skirt, right sides together. Notice how the zipper seam allowance has been opened out with the facing. This will be folded in once the stitching is completed.


After stitching, trim down the seam to 1/4" and clip to ease the curve. I always understitch my facing seams. This is done by turning the seam toward the facing and stitching close to the seam line on top of the facing. This prevents the facing from rolling to the outside during wear. Once the understitching is complete, turn the facing to the inside and press.


Open the facing out once more along the center back and fold in the edges of the facing and press, then fold back inside once more.


Edge and topstitch the top finished edge of the skirt, then stitch in the ditch on the side seams to secure the facing. Now it will stay in place during washing and wearing!


Add a ruffle to the lower edge of the skirt, starting at the center back seam against the right side. Notice how I left the first part of the ruffle free. This is so I can join the ends of the ruffle before sewing it to the skirt.


Once most of the ruffle is in place, I stop and fold back the ends of the ruffle and press. Then, open out the ends and mark those creases. Align the creases and stitch together. Trim down the seam and finish attaching the ruffle to the skirt.


Make the lower section of the skirt by placing them right sides together and stitch the side seams. Press seams to one side, then add it right sides together to the lower edge of the skirt on top of the ruffle. Stitch in place.


Press the ruffle down to rest on top of the lower skirt. The seam allowance is pressed upward. Edge and topstitch this seam. Add another ruffle (this one is 4" wide, then folded in half before adding to the skirt) just as the other ruffle was added.


Press and topstitch the seam.


Now for the flower! I cut one 1 1/2" wide strip and folded it in half just like I did for all the other ruffles, ONLY this time, I pressed a small amount at each end to the wrong side for a neat finish. When I gathered it, I set the ruffler for EVERY stitch so it would have a tighter gather. Once gathered, I pressed it flat and began rolling it up.


Once it is rolled up, I used a double threaded needle and hand stitched the layers together. Leave the needle attached once the stitching is complete. See the difference between the flower that has been steamed and the one that hasn't? I like to think that my iron makes these "bloom"!


Use the attached needle and thread and stitch the flower to the lower right seam.

This skirt is ready to wear! I hope you found some inspiration to make this YOUR summer of no pants!

Happy Sewing....