July 29, 2013

Winner!

Thanks to all of you who left a comment for the giveaway!
According to random.org, our lucky winner is Julie P, who said:
 
 
This book is adorable. I just recently started embroidering and I would love to have this book.
July 28, 2013 at 7:18 PM
 
Congratulations!
Please send me a message here with your address and I will get your book out ASAP. Enjoy!!

July 25, 2013

Stitching for the Kitchen Book Review and a Giveaway!

This Giveaway is now closed. Thanks for your comments.
The winner will be announced today!

Hey All!

Hope you have been enjoying your summer. It has been busy here with so many things! We have enjoyed a somewhat cooler summer than what we have had the past couple of years, so we are super grateful for that.

I was sent a delightful book in the mail from Sixth and Spring several weeks ago to review and share with you all. It is Gooseberry Patch's newest publication, Stitching for the Kitchen! It is packed with all sorts of wonderful projects, everything ranging from hand embroidered items to a carrying case for your sewing machine!


The first thing I noticed about the book is the binding. I love the concealed spiral binding since these types of books are just so darn easy to use. I also love that the full size pattern pieces are only printed on one side so you can go ahead and just cut out what you need. Fabulous!! The instructions are well written and easy to follow, plus there are illustrations to help along the way. The book is packed with great photos that are bright and cheery.

I decided to make a project from the book with some fabric I had lying around. I decided to use Spring House from Moda for the handy Market Tote Bag. The construction is very simple so it goes together rather quickly. I think it would be ideal for carrying to the farmer's market or to your favorite grocery store to gather up the freshest foods for enjoying at home. Of course the beauty of using a fabric bag is that it can be used over and over again, so it is friendly to the environment. You can also just throw it into the wash whenever it needs it. I plan on folding mine up and stashing it in the car to have handy the next time I need some groceries.
 
 
Because I can't help myself, I used more prints than what is called for in the pattern instructions. I had 4-5 prints from the collection and didn't really have enough of any one particular fabric to completely satisfy what was called for in the supply list, so it was a perfect opportunity to scrap this bag around a bit.

Here is my result! I think it turned out quite nicely. I will definitely be taking it with me the next time I go to Whole Foods (my favorite grocery store, by far!). I didn't realize how much this bag would hold until I got ready to fill it for the photo....wow! It really does hold a lot and I like the way the handles are added. At first, I didn't really get why they continued around from one side to another as it seemed that it would be awkward to carry, but the contents do travel well with them sewn this way.


I took only one other liberty with the design and added interfacing to the handles. If you want to do this, just cut 6 - 3" wide strips and add it to the wrong side of two sets of the handles (I added it to the side that would face out), then sew together. I think it makes for a sturdier handle.

One other word of caution...when I was cutting out the pattern, I noticed that the pocket pattern piece said to cut 2. You really need 6, so be sure to do that. You have plenty of fabric from the requirements, so don't fret about that part. I thought that was only a minor error and one that you would easily realize once you start to make the bag...no big deal!

Now for the GIVEAWAY!
I'll be sending a copy of this book to ONE LUCKY WINNER!
All you have to do is leave a comment about why you would like to own it. PLEASE leave only one comment per person. Any additional comments from the same person will be deleted to keep this fair for everyone. The giveaway starts today and will run through Sunday, July 28th at midnight, CDT. Don't delay, leave a comment today!!

If you would like to increase your chances of winning this book, don't forget to visit some of these blogs later on in the week and into next week.

July 22


July 23


July 24


July 25


July 26


July 27


July 28


July 29


July 30

Gramma's In the Kitchen

August 1


August 2

Delightful Country Cookin


Happy Sewing!

May 2, 2013

Patterns for Sale!


We posted the new patterns to the website last night. We also posted an announcement on Facebook last night, but for those of you who do not follow there, this is your official notice! For those of you who have already ordered, we sincerely thank you...your patterns are going out today, so get your fabric and machine ready to go!
 
Happy Shopping and Sewing!!
http://www.sewserendipity.com
 

May 1, 2013

Spring 2013 Collection: Meet Naomi!

Today is the last reveal of the new spring collection. The Naomi Dress is my latest design that has NO CLOSURE! Yes, it is like Claire and Diane as well as the Fashion Formula Dresses in that there is no zipper or buttons to worry about! This makes for easy construction and fit, as you adjust the elastic waist to fit you the way you want.


Maxi Length with dipped back hem, Westminster fabrics: Joel Dewberry's Notting Hill

Design details include 3 small pleats at the front neckline which helps to provide the fullness for the bustline. The back neckline features an optional keyhole detail. You can always opt to just cut the back bodice on the fold and not cut the keyhole for an entirely different look. The cap sleeves are cut on the bias with the lower edge of the armhole finished with a bias binding. The waistband fits a little under the bust but not as low as the regular waistline. The front of the waistband is not elasticized, creating a smooth silhouette to the front of the dress. The slightly A-line skirt is roomy without being too full and offers 4 different hemlines: tunic, knee, mid-calf, and maxi, so not only can this design be a dress but a darling top as well! I have also provided a separate back skirt piece that has a dipped lower hem. This hem is not as exaggerated as some of the hemlines in current fashion, as I wanted it to be subtle and noticed from the side and back, but not tremendously from the front.


Mid-calf length with dipped back hem, Fabric: Moda's Happy Go Lucky by Bonnie and Camille

As always, I have provided many ways for you to change the look of the dress just by changing the fabrics or adding a few details here and there. I love the way this design can take on the look of a skirt and blouse simply by making the bodice from one fabric, the skirt from another, and then set the whole thing off with a contrasting waistband and hem.


Knee Length, Fabric: Michael Miller's Cosmos by Laura Gunn

I also played around with layering fabrics for the skirt. I used some textured whites and eyelets that I had, but this would be lovely in rayon or cotton voile as well.


Knee and Mid-calf length layered with dipped back hem, Fabric: my personal stash of textured whites, trimmed with wide eyelet lace

This design is very forgiving with the roomy skirt and elastic waist. The bodice is roomy enough for cup sizes A-D without alterations, so it will suit a variety of body shapes and sizes! The pattern includes full instructions and details about my variations, as well as full size tissue sheets with a range of 7 sizes.

 
Knee length with back dipped hem, Fabric: Michael Miller

Again, we are in the process of posting these new patterns to the website. Look for them to be available in the next couple of days. If you would like notification of when these will be available, all you need to do is be sure that you have an account set up with us (no need to set up any payment options when you do) and check the box to receive our newsletters. That way you will know when these are ready as well as any sales or promotions that we are doing.

Happy Sewing!

April 30, 2013

Spring 2013 Collection: Meet Bijou!

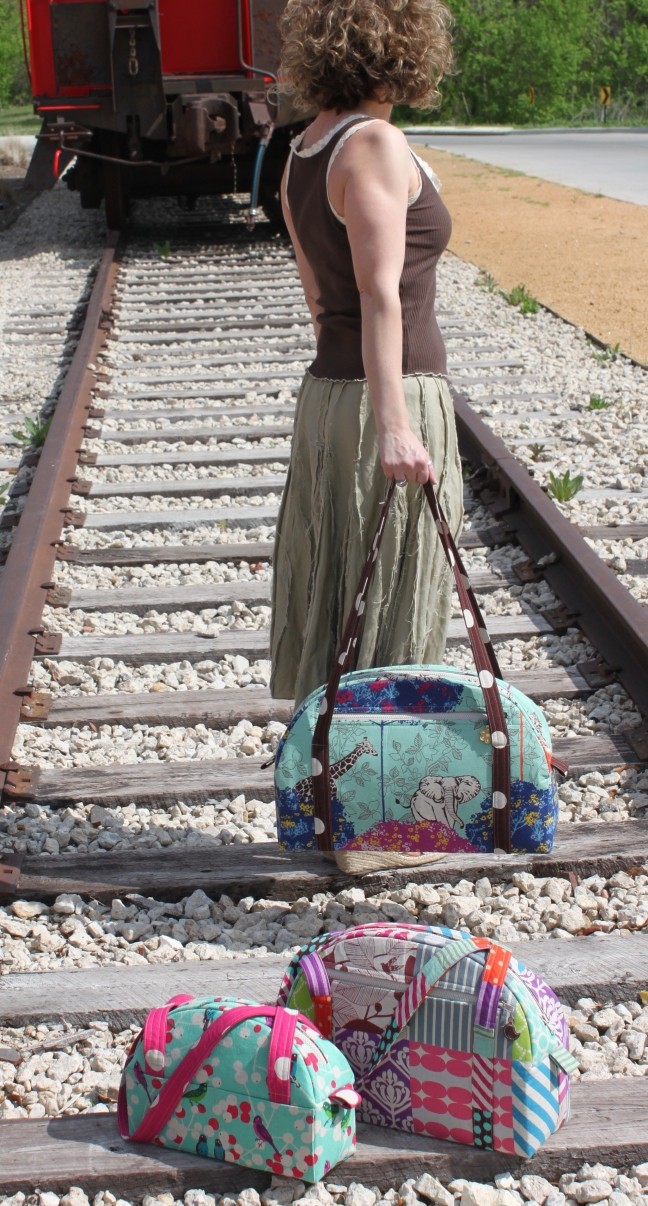
Today is the second big reveal of the spring collection. Some of you might recognize Bijou from a few years ago! The pattern had gone out of print but I still had customers asking for this one so I decided to see if I could add some more sizes, tweak the design a little, and offer it again. My sewing/design math worked out beautifully so here they are, the Bijou Travel Trio!


I love to think of these bags as a lovely set of soft-sided luggage that you can customize to your liking with any fabric you choose. One of the things that I did to make the bags suitable for today's demands is to add a great padded exterior pocket that zips. On the medium and large bags, this pocket is large enough to accommodate a tablet computer such as the Microsoft Surface or iPad. The small size has a pocket to accommodate any regular size eReader or mini-tablet computer. Because this pocket is exterior, access is easy at the airport where you need to be quick to get through security! If you haven't used Soft and Stable yet, this is the product I used to pad the pocket and I love the result. Because the outside of the bag is made with Peltex, this pocket gets the benefit of that protection as well, so no worries about damage to your precious electronics here!


The largest size bag is the original size from the "old Bijou" pattern. I changed up the pockets by adding that snazzy outside zippered one and then added a smaller zippered pocket on the inside as well. These bags are surprisingly roomy and they hold a lot. From my previous experiences traveling with the largest size, it lays on its side well to slide under the seat in front of you when flying. I love having access to my stuff on the plane and this way you don't get dirty looks from the flight attendants!
 
I am excited about the medium and small sizes too! The medium is a great size for when you need to carry a little less. It is still very roomy and allows you to carry your computer safely. It would be a great project bag if you like to do needlework or carry around books, magazines, paperwork, or even snacks! I am planning on making myself a set to take to market. The largest will be used for flying and then the medium for carrying around our paperwork to and from market. The small will be great for carrying just the incidental items.


When I designed the smallest size, I thought about how cute it would be for a little girl to have a bag like her mom! It is small enough for a young girl to carry around and just think what she could put inside...doll clothes, books, craft supplies, snacks! It would be adorable!


One of the best features about this set of bags happened rather upon accident. Once I had finished a set, I needed to set them off to one side and get them out of the way of my sewing chaos. I realized that they will all nest inside one another! This is a wonderful storage solution for when you are not using the bags. You can have three bags in the space that one takes up! This is how I will ship the bags to and from market for the booth....perfection!

The sizes for these bags are as follows:
Large: 18"w x 12"h x 6" d
Medium: 15"w x 10"h x 5"d
Small: 12"w x 8"h x 4"d
 

One set of samples shown here were made from Michael Miller's new home decorating cotton sateen, Bekko. I love how the gray and white prints play together. The other set was made from Echino linen. For those of you not familiar with this fabric, it is a fantastic line of Japanese fabric. They always have such interesting designs. I find myself drawn to them often! The last bag shown in the pattern is a stand alone bag in the medium size and that is  Michael Miller fabric, Secret Garden by Sandi Henderson.


This bag design is for the intermediate to advanced bag sewer. It is constructed from Peltex with a fusible fleece zipper panel at the top. You could make it from a different stabilizer, but it will not have the same substantial feel that Peltex yields. I also advise that if you want to have an easier time making these bags that you use quilting weight cotton. The heavier fabrics do make the seams bulkier and usually mean that you need to use a denim needle in your machine. Time and patience are key here...but I promise that it isn't as hard to make as the Weekender....we all know the one I am talking about!

The pattern features many illustrations to get you through the construction process along with tips to get the bag just right as you sew. There is a large paper sheet with the pieces printed on it. You will find that it is double sided. I did this because I really want you to trace your patterns onto freezer paper. This is how I make the bags myself. I love that I can lightly iron the shiny side of the paper to the stabilizer to cut it out. It is quick and accurate without having to pin anything, and once you have made your templates, you can use them over and over again.


As I mentioned yesterday, we are in the process of adding the new patterns to the website. These will go live later on this week as I want to get through introducing you to all the newbies before we sell them!

Happy Sewing!

April 29, 2013

Spring 2013 Collection: Meet Marilyn!

To say the least, it has been just a bit busy around here! We completed the photos for the new collection at the first of the month, then pattern instruction writing ensued and finalizing everything for sending it off to the printer took over for a week or so. Then, being the crazy person that I am, I always seem to get the itch to do things to our house in the midst of getting ready for market! This year it was getting new floors in our home office and my studio. That happened mid month and things are just now getting back to normal! Thanks for your patience. I know a lot of you have been relentlessly checking this blog to see the new stuff....well, your wait is over!


Fabric: Simply Style by V and Co. for Moda

The first new design I would like to share with you today is the Marilyn Dress. This is a sexy summer dress that is meant for you to let your inner starlet shine! The design features a close fit with a high waistband for the most flattering look to your silhouette. The V-neckline is featured at both the front and back necklines. There is subtle gathering at the lower bustline as it attaches to the waistband. This design as is can accommodate bustlines from size A-C cup. A large bust adjustment can be made to the bodice pieces for the fuller figured gals as well.


Fabric: Michael Miller Neon Dot and Solid

This dress has a super full skirt which is great fun to wear! I felt like a starlet wearing it for the photo shoot!! You will notice in the photos that I played around with the fabrics to provide you with fun variations for this dress. Such variations include a bias trim to accent the waistband and hemband, a contrasting fabric at the waist, and contrasting trims at the hemband.


Fabric: Riley Blake Ombre Dot and Solid

This dress has a center back invisible zipper closure. Don't be afraid of installing an invisible zipper. They really are much easier than you think. I have a tutorial here on the blog (see the right sidebar for more info) to teach you how to install this type of zipper. You can even do it with a regular zipper foot!


Fabric: Westminster Martha Negley Floral trimmed with Riley Blake dot


Fabric: Windham Hello, Gorgeous!

Stay tuned this week....I will be blogging about the rest of the collection tomorrow and Wednesday and we will be working this week to get these listed for sale on the website. The stock came in late last week, so as soon as we get them listed you can add them to your long list of spring and summer sewing. I can't wait to share the rest of the collection with you. I hope you find it inspiring!

Happy Sewing!

February 11, 2013

Sew Red!

Welcome to my blog, everyone! As you all know, February is National Heart Health month, with an emphasis on its impact to the health of women. I am so proud to share with you my contribution to a wonderful new book, Sew Red, which furthers this wonderful cause. This book is the dreamchild of Laura Zander, the creative genious behind Jimmy Beans Wool in Reno, Nevada, and of course online!

I had the priviledge to meet Laura in person at Spring Quilt Market in 2012 at Kansas City. She is a creative ball of energy and so fun to talk to! She published a book of knitting designs last year called Knit Red, which is a collection of projects from well known knit designers in the industry. She wanted to follow up with another book, this time centered around sewing, and asked if I would like to contribute a project. I enthusiastically jumped on board and designed this great new skirt for the book. Imagine my surprise and thrill when I saw the final cover and discovered that my skirt is featured there!


Laura and I share a passion about heart health awareness. The wonderful thing about the books that Laura publishes is that the proceeds go to the American Heart Association to raise awareness and improve the treatment for people with heart disease through research. Inside the book, each designer talks about heart health and what they do to stay healthy. Heart disease runs in my family, so I work hard to do what is best for my heart. I want to be around for a long time!

Both Knit Red and Sew Red are available through Jimmy Beans Wool. Just click on the book titles or the shop name to navigate to Laura's site to see more. We anticipate that the stock for the book will arrive soon, so your wait should be very short! These are lovely hardback books packed with designs from some of the best known designers in the industry. There is plenty of beautiful photography as well as easy to follow, well written instructions that are illustrated.

In Sew Red, you will find a variety of projects, everything from quilts to tablerunners, bags, clothing, and other accessories. I feel very honored to be a part of such a fabulous group of designers!

Here is the skirt I designed for Sew Red. It is called the Sweet Sixteen Skirt. It is made by cutting panels with a rotary cutter, ruler, and mat based on your hip size. It got its name because it is constructed of 16 main panels, with contrasting godets of alternating height at the hemline and a sweet bias trim. I chose the wonderful Moda line of fabric called Marmalade and love the way it came out! This makes for a lovely swingy skirt, but keeps the bulk of fabric to a minimum at the waistline. There are two rows of narrow elastic at the waist, so the fit is super easy to achieve. This also allows you to decide if you want to wear the skirt at your natural waist or lower on the torso.


I hope that you will decide to get a copy of this wonderful book! Not only is it packed with great designs, it is for a great cause.

Credits:
Sweet Sixteen Skirt from Sew Red by Laura Zander, published by Sixth&Spring Books. Photos by Rose Callahan copyright © 2012 by Sixth&Spring Books/Soho Publishing. Used by permission.
 
Happy Sewing!!